Exploring the Agent 365 CLI

Ever since Agent 365 was announced at this year’s Microsoft Ignite, I have wanted to explore this exciting technology and the possibilities it creates. Since the Model Context Protocol is a topic that is dear to my heart, I got especially interested in the Agent 365 MCP Servers, and the way they make it possible for an agent to interact with the various Microsoft productivity applications, such as Word and Teams, in different ways. Lately, I have explored this particular topic in depth in a number of videos and blog posts:
-
In Part 1: Using A365 MCP Servers from a custom agent and Part 2 - Building the agent I explored how the Agent 365 MCP Servers can be used from a custom agent.
-
In the blog post Creating dynamic MCP Servers using Agent 365 I checked out the possibilities of dynamically creating custom MCP Servers in Agent 365, servers that can use the many out-of-the-box operations provided by Dataverse and the Graph API. I also demonstrated how to use this dynamically created MCP Server in a Copilot Studio agent.
However, the MCP servers are just one piece of the Agent 365 puzzle. Another game-changer in Agent 365 is the ability to onboard agentic users in your tenant - agents that can act on your behalf, or autonomously, in a governed and secure way.
During the last year I have written quite a bit about the need for governance when building an AI agent infrastructure, and Agent 365 is the technology in the Microsoft stack that enables this. Exciting times!
When I watched Robert Bruckner and James Oleinik present the session “Build A365-Ready Agents for the Enterprise“, I got interested in creating my own A365-integrated agent. In the session they demonstrated a number of really cool things in Agent 365, such as:
- The ability to onboard agentic users and govern them in the Microsoft 365 Admin Center.
- Agents that use the Agent 365 MCP Servers to interact with productivity applications, such as Teams and Word.
So, I have spent the last couple of weeks trying this out, resulting in a LinkedIn-post that shows a video of an A365-agent running in Teams that uses a few of the A365 MCP servers. Kudos to Tahir Sousa and team for helping me sort it all out!
In this blog post my goal is to explain in detail how this was done, so you can try it out for yourself - as well as learn a thing or two about the technology that powers Agent 365.
Heads up: Agent 365 is evolving fast. Treat this blog post as a snapshot - check the official A365 docs for current info, and expect any issues that I mention here to be resolved by the time you read this.
More SDKs than you can shake a stick at
As we start exploring Agent 365, there are a number of SDKs that we should be aware of:
- The Microsoft Agent 365 SDK is the new SDK that adds the cool capabilities that Robert and James demonstrated in their Ignite session, for example:
- Notifications - An agent can be notified when e.g. a mail is sent to the agent, or when a comment is requested in a Word document.
- Observability - tracing, caching and monitoring of agents - stuff that I haven’t tried out yet but hope to be able to soon.
- Tooling - Libraries for using the A365 tooling servers from your agent.
- The Microsoft 365 Agents SDK - This is the foundational SDK that the A365 SDK is built on top of, and that allows for creating agents that can be deployed to a myriad of channels. In the blog post The Teams AI Library, M365 Agents SDK & Toolkit and how to run Doom in Teams that I wrote back in October, I took a look at this SDK and the associated tooling, with specific focus on deploying chatbots to the Teams channel.
As I noted in my previous blog post, the M365 Agents SDK “comes with a steep learning curve and involves considerable ‘black box infra voodoo’”. When working with A365, that feeling is still there - though it’s somewhat less pronounced… More on that below.
Also part of A365 are a couple more interesting GitHub repos:
-
Microsoft Agent 365 DevTools CLI - This is the CLI that we will use to provision the infrastructure needed for our agent and to package and deploy it. This is similar to the Microsoft 365 Agents Toolkit in M365 Agents SDK - which also can be used for provisioning and deployment, but this time things are done a bit differently. The docs for the CLI can be found here.
-
Agent365-Samples is a repo with “starter kits” for building an agent in different languages, and agent orchestrator frameworks.
Step 0 - Setting things up locally
So where to start? The amount of SDKs, GitHub repos and resources available for A365 can be a bit overwhelming at first. So, let’s start by trying to get an agent up and running locally.
The way to test agents locally in M365 Agents SDK was to use Agents Playground and in A365 Agent SDK this is still the recommended approach. I have tried this, and it works but it is currently pretty cumbersome, because of this:

So, rather than doing that I thought I would try out debugging the agent locally using the good old devtunnel approach that I have used in days past, when tinkering with the M365 Agents SDK and Toolkit. Devtunnels makes it possible to deploy the agent to the cloud, while at the same time pointing the agent Messaging Endpoint to my local machine - pretty powerful (if it works)! More on that below…
First, let’s install the Agent 365 CLI which is a tool that simplifies setting up the infrastructure necessary for our agent:
dotnet tool install --global Microsoft.Agents.A365.DevTools.Cli
We need some code to get us started, so let’s clone the A365 samples repo:
git clone https://github.com/microsoft/Agent365-Samples
I’m a C# guy, so the sample I am interested in is the C# Microsoft Agent Framework one. This sample project contains a simple agent that uses Microsoft Agent Framework and that utilizes some of the A365 MCP Servers.
If we open up the sample project, we can see that:
appsettings.jsoncontains a lot of placeholders. These placeholders will be automagically populated when we run the A365 CLI to create the infrastructure for our agent. This is also described here in the docs, but is in my opinion pretty confusing…ToolingManifest.jsonlists all the A365 MCP Servers that the agent uses. This file is used both by the CLI to create the correct permissions for the agent blueprint in your tenant, and also to keep the agent itself informed about which tools it has access to.
Also, let’s install devtunnels - the nifty technology that allows us to route requests from a bot running in the cloud to our local machine:
winget install Microsoft.devtunnel
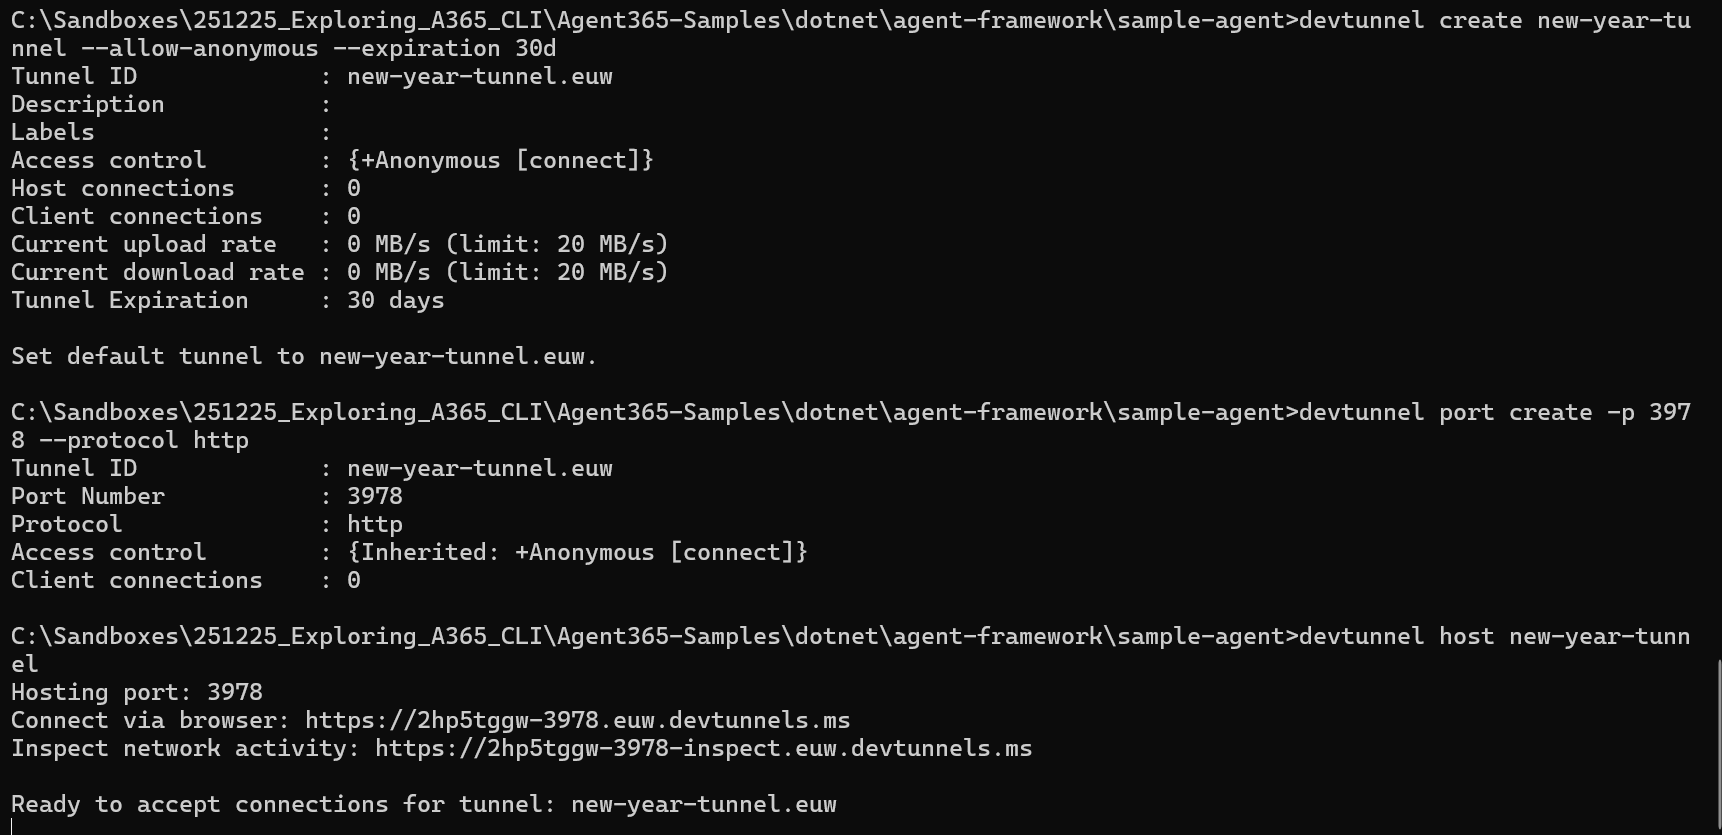
We then create a devtunnel that listens on port 3978. NOTE: Don’t create anonymous devtunnels - security is important!
Make note of the public devtunnel URL, we will use this as the bot messaging endpoint when we provision the infrastructure in the next step.
Now we have what we need locally to start creating our agent, so let’s move on to infrastructure provisioning using the A365 CLI.
Step 1 - Creating the infrastructure
This is where the magic happens. We want to use the Agent 365 CLI to create the infrastructure necessary to use our agent - locally at first, and then deployed to our tenant.
The first thing we need to do is to create a new App Registration in Entra ID for the A365 CLI, as is described here. This is required to give the CLI the correct permissions to work with agent blueprints, etc. Make note of the application id of the newly created app registration, this is used in the next steps.
Then, navigate to our sample agent, and run the a365 config init command. This collects some information and creates the a365.config.json file, that will be used for infra provisioning.
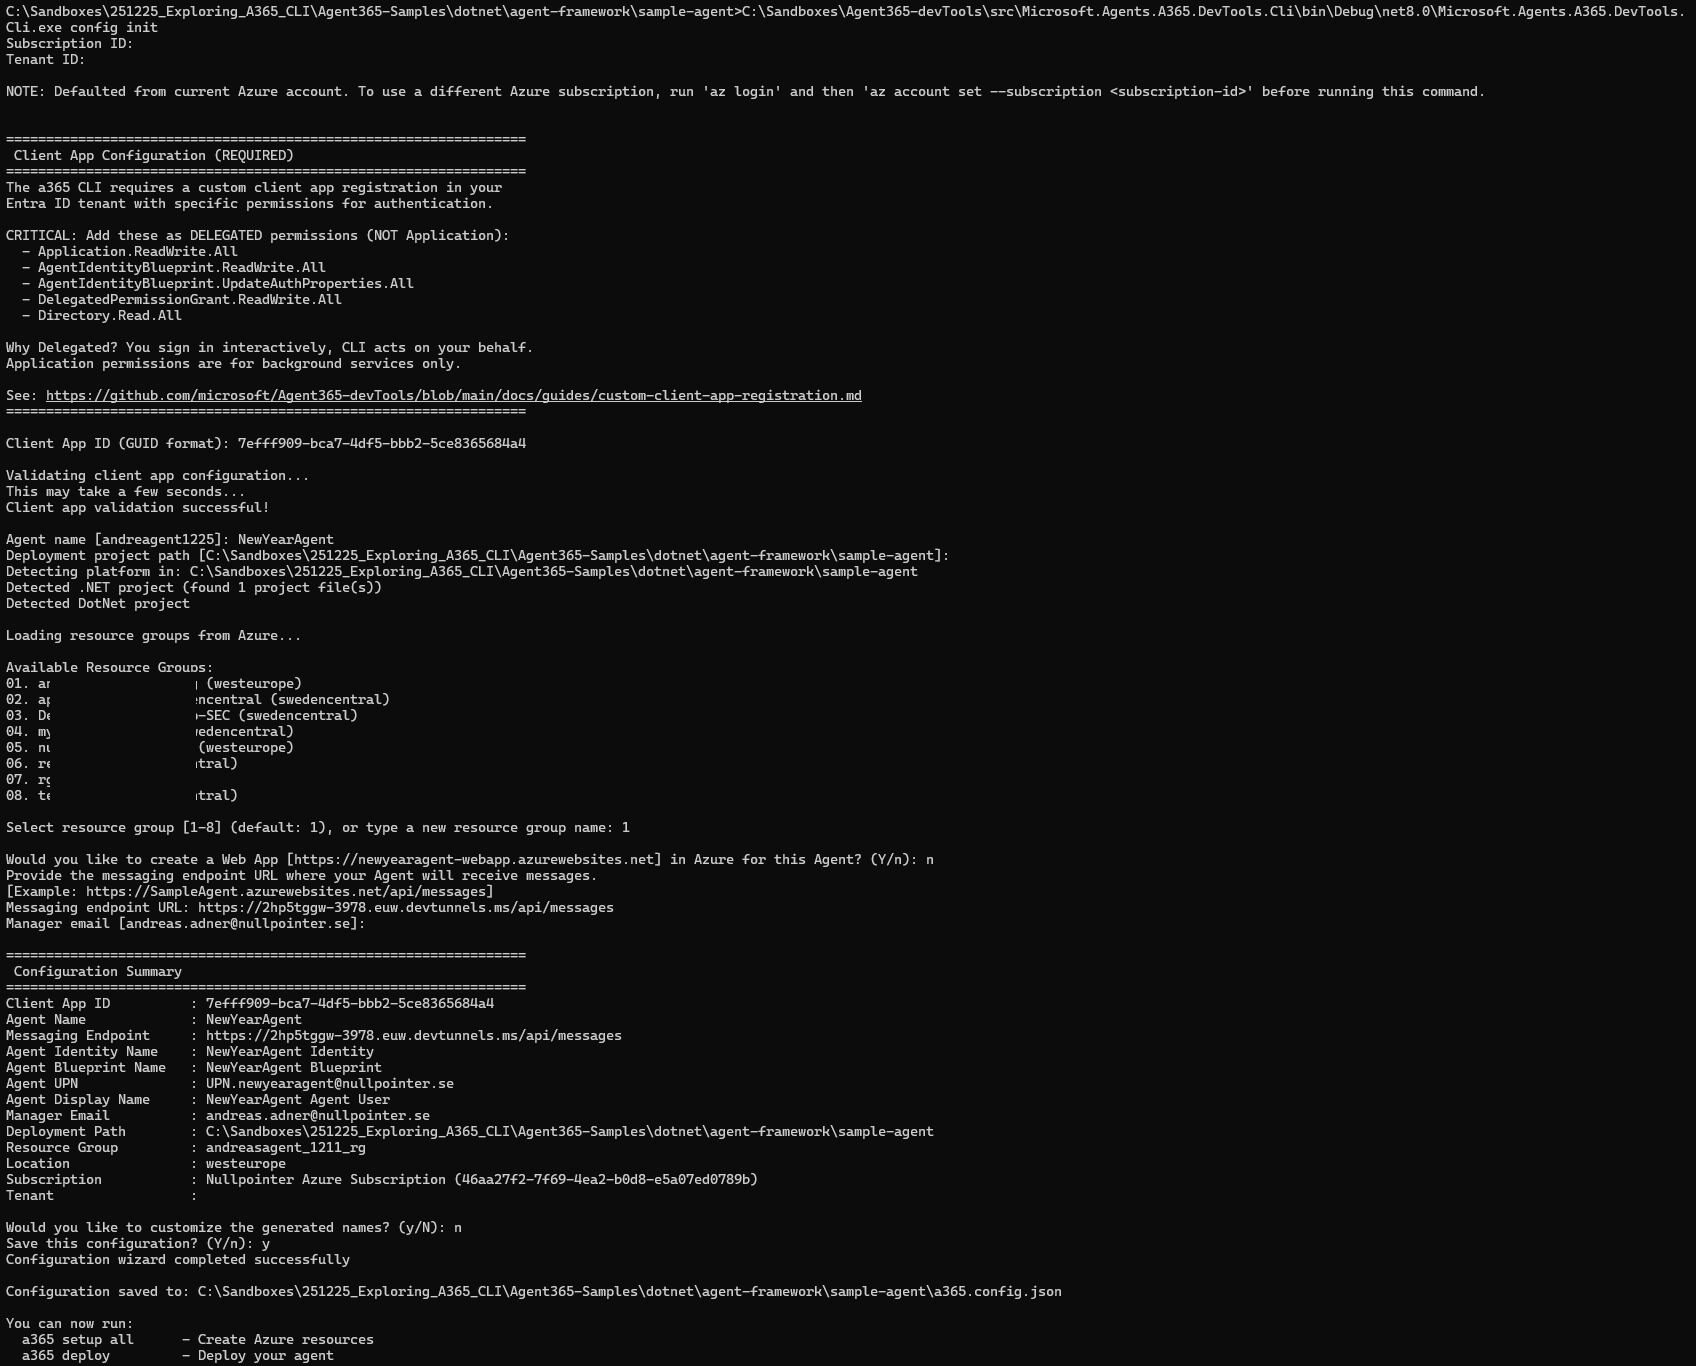
Note that:
- We enter the application id of the Agent 365 CLI App Registration that we created earlier.
- It doesn’t matter which resource group we select, since we have no intention to deploy anything to Azure, we only want to run the agent locally.
- We don’t want to create a Web App, for the same reason.
- The Messaging endpoint URL is set to the URL of the devtunnel we created earlier. Note that it is not possible to change this URL later (in any simple way), but this is a requested feature.
Now we can proceed with setting up all the required infrastructure by running the a365 setup command:
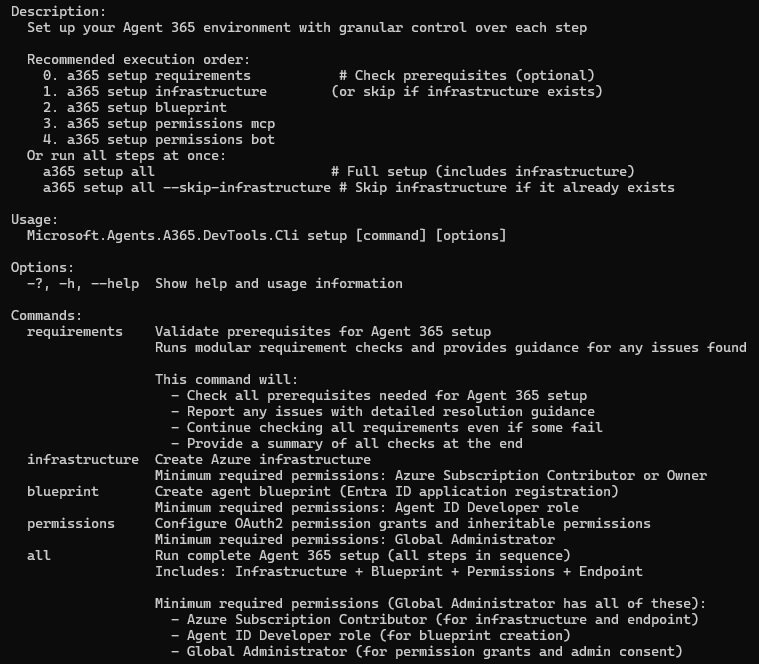
First, we can run the a365 setup requirements command, to check if we are good to go:
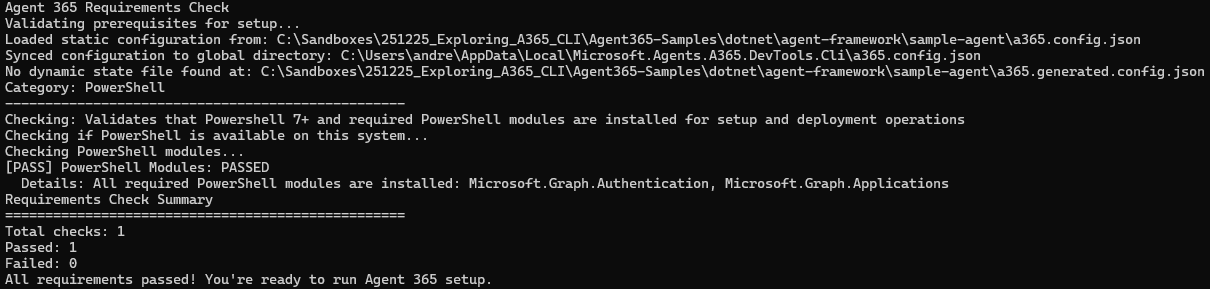
Great, let’s proceed! We don’t have to run a365 setup infrastructure since we - as we noted above - only intend to run the agent locally in this demo. So, we continue by creating the Agent Identity Blueprint.
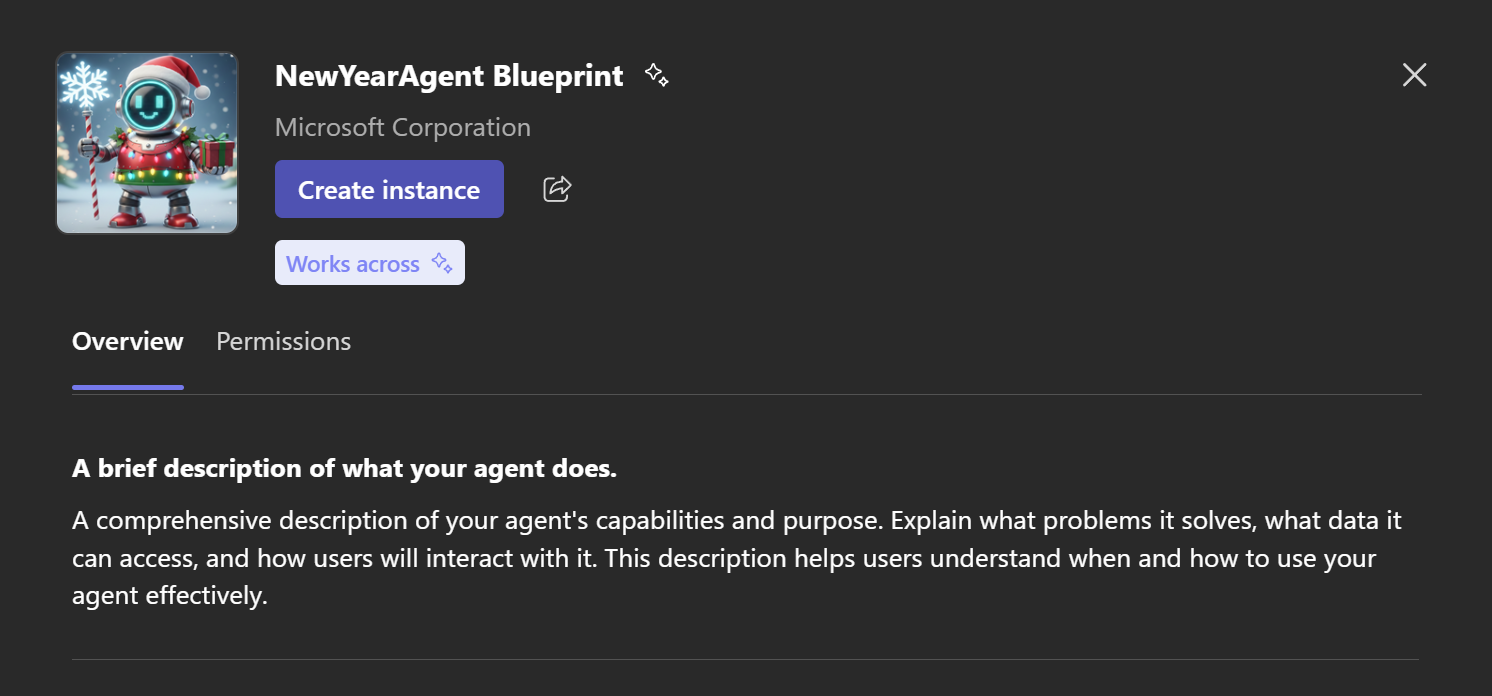
But wait, what is a Blueprint?
The documentation for Microsoft agent identity platform for developers defines an agent identity blueprint in the following way:
“All agent identities in a Microsoft Entra ID tenant are created from an agent identity blueprint. The agent identity blueprint is a key component of the Microsoft agent identity platform that enables secure development and administration of AI agents at scale. An agent identity blueprint serves four purposes… Organizations can deploy many instances of an AI agent. Each instance pursues a different goal and requires a different level of access. Each instance uses a distinct agent identity for authentication and access. However, the many agent identities used share certain characteristics. The agent identity blueprint records these common characteristics, so that all agent identities created using the blueprint have a consistent configuration.”
So let’s create the agent identity blueprint by running the command a365 setup blueprint. This command does LOADS of stuff, for example:
- Creates the agentic identity blueprint, sets permissions and applies admin consent to these. Once created, the blueprint can be found as an Enterprise Application (i.e., service principal) in Entra ID, with the following inheritable permissions:
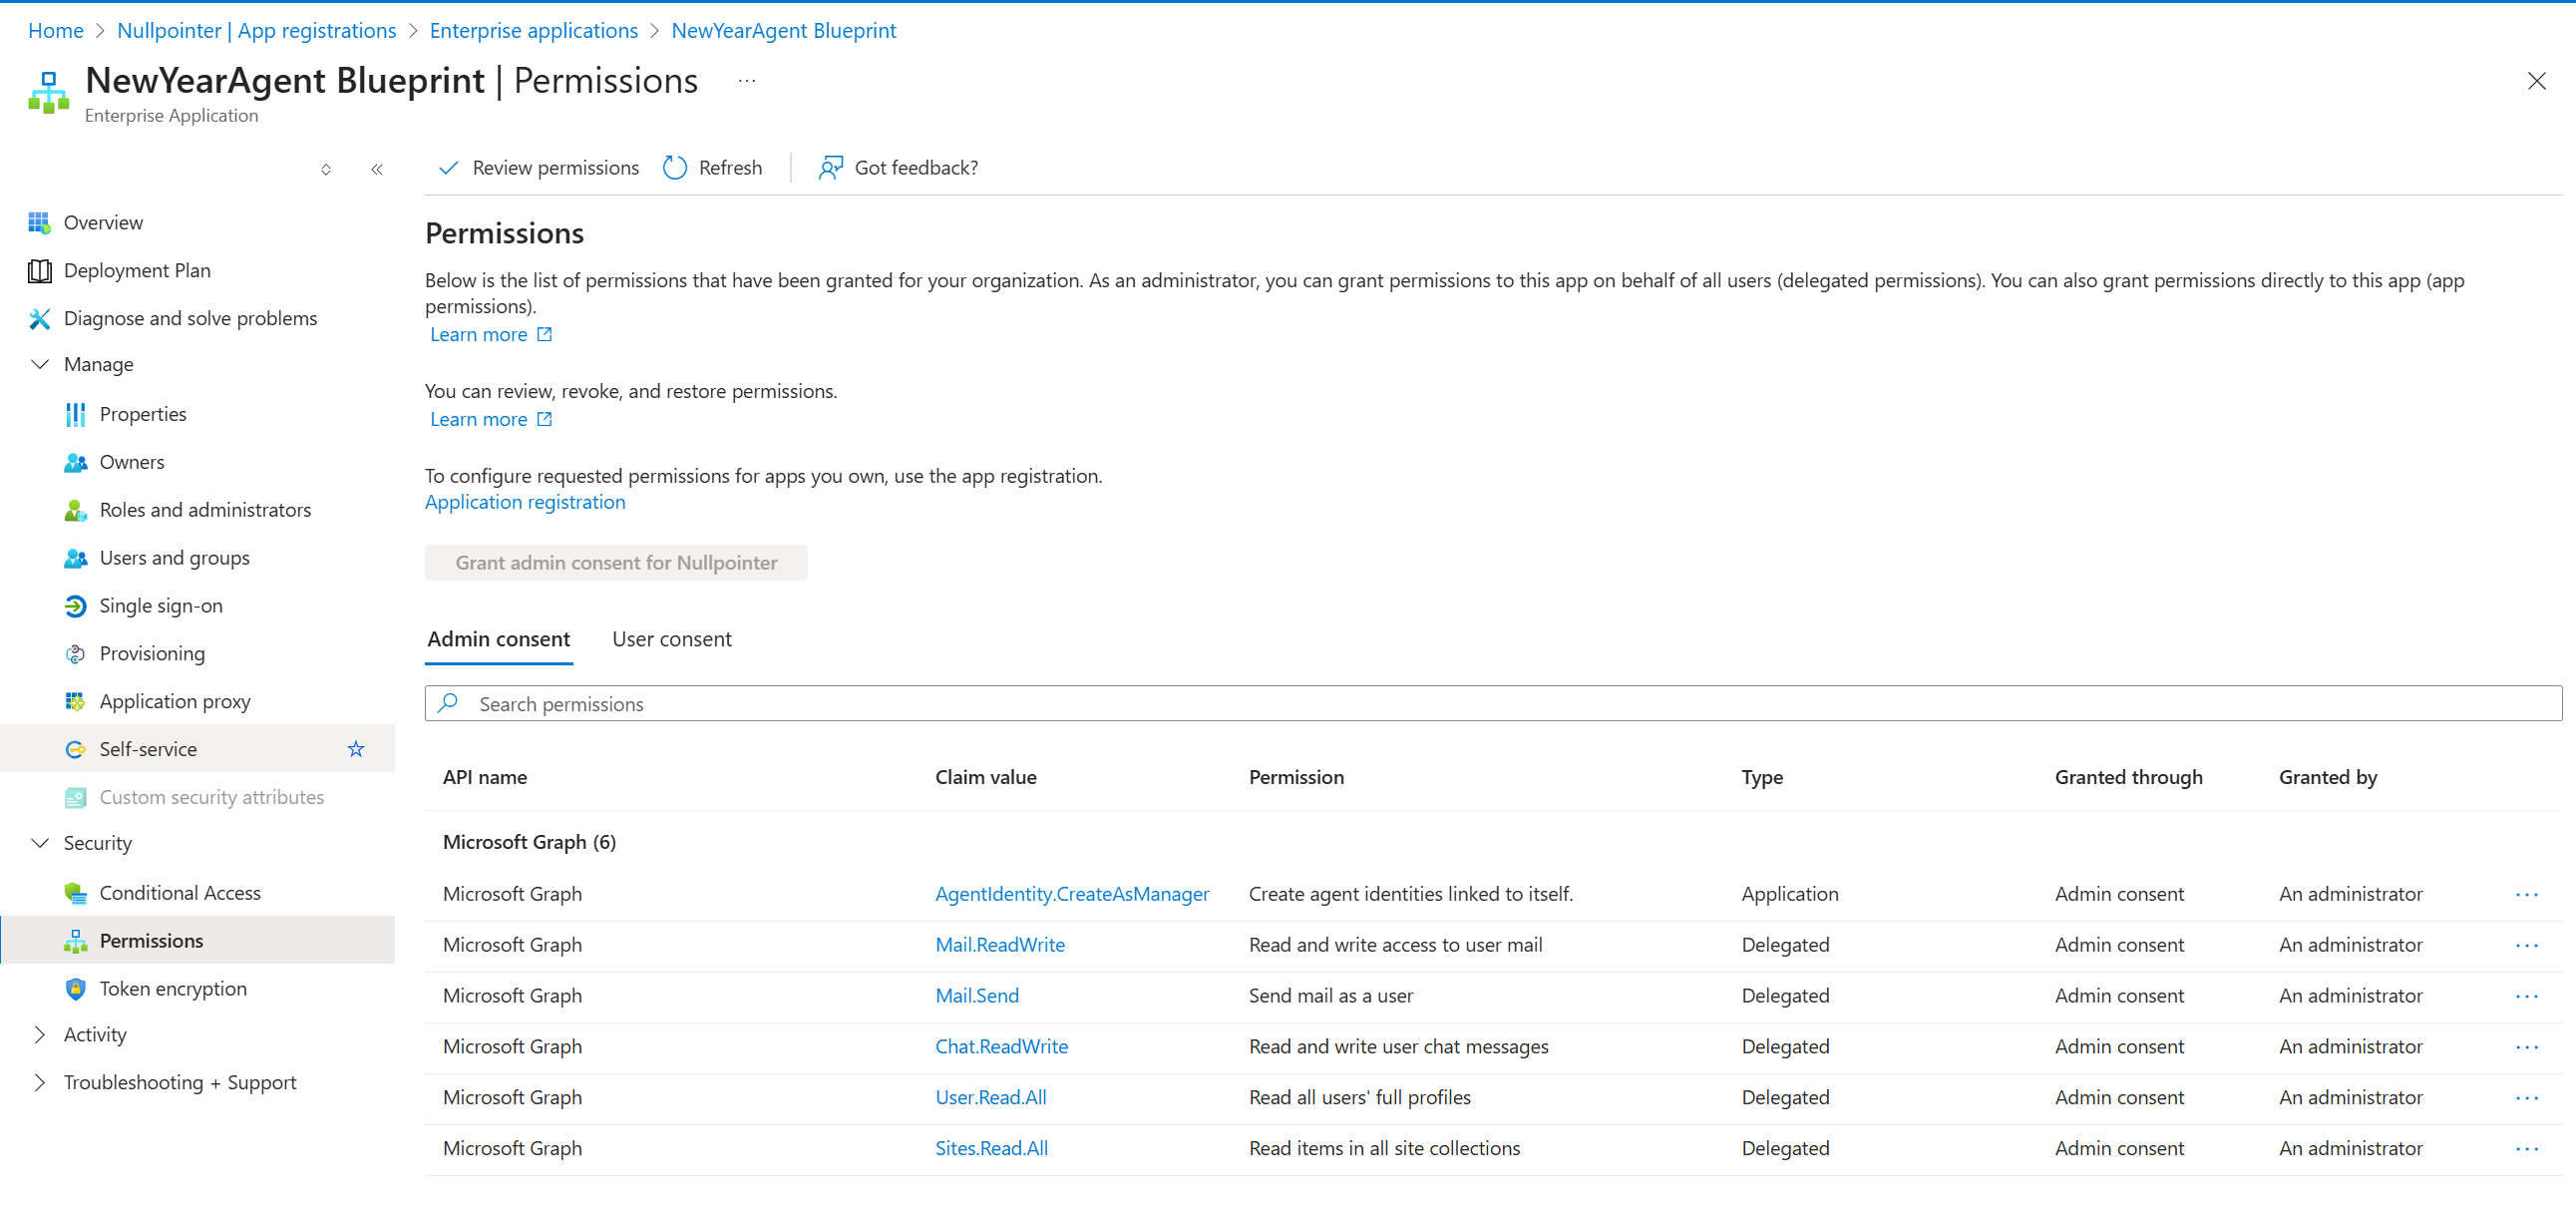
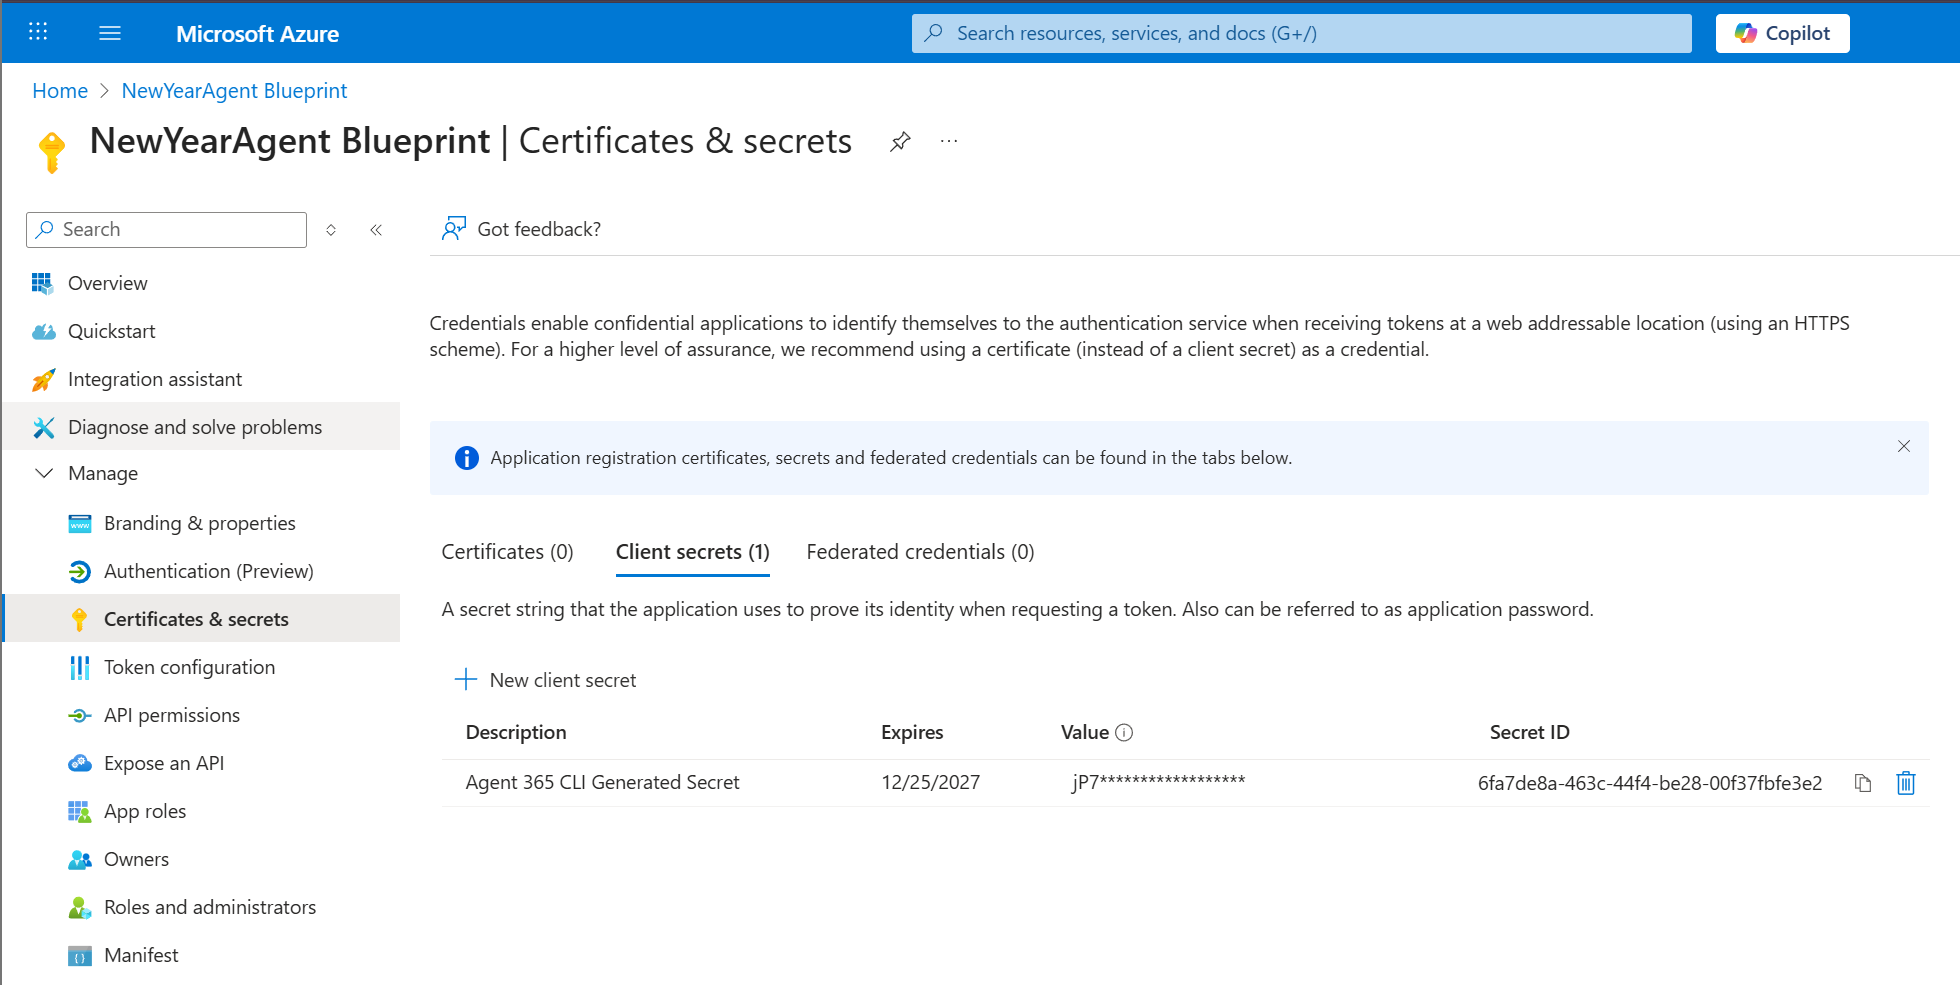
- Creates a secret on the App Registration:
- Updates
appsettings.jsonof our agent and populates the placeholders. - Creates a file called
a365.generated.config.jsonwith information about everything that has been created. - Registers the messaging endpoint that points to our local devtunnel in this case.
So, we now have an agent identity blueprint that can be used to create agent instances! It has a couple of inheritable permissions, but we need to add a few more by running these commands:
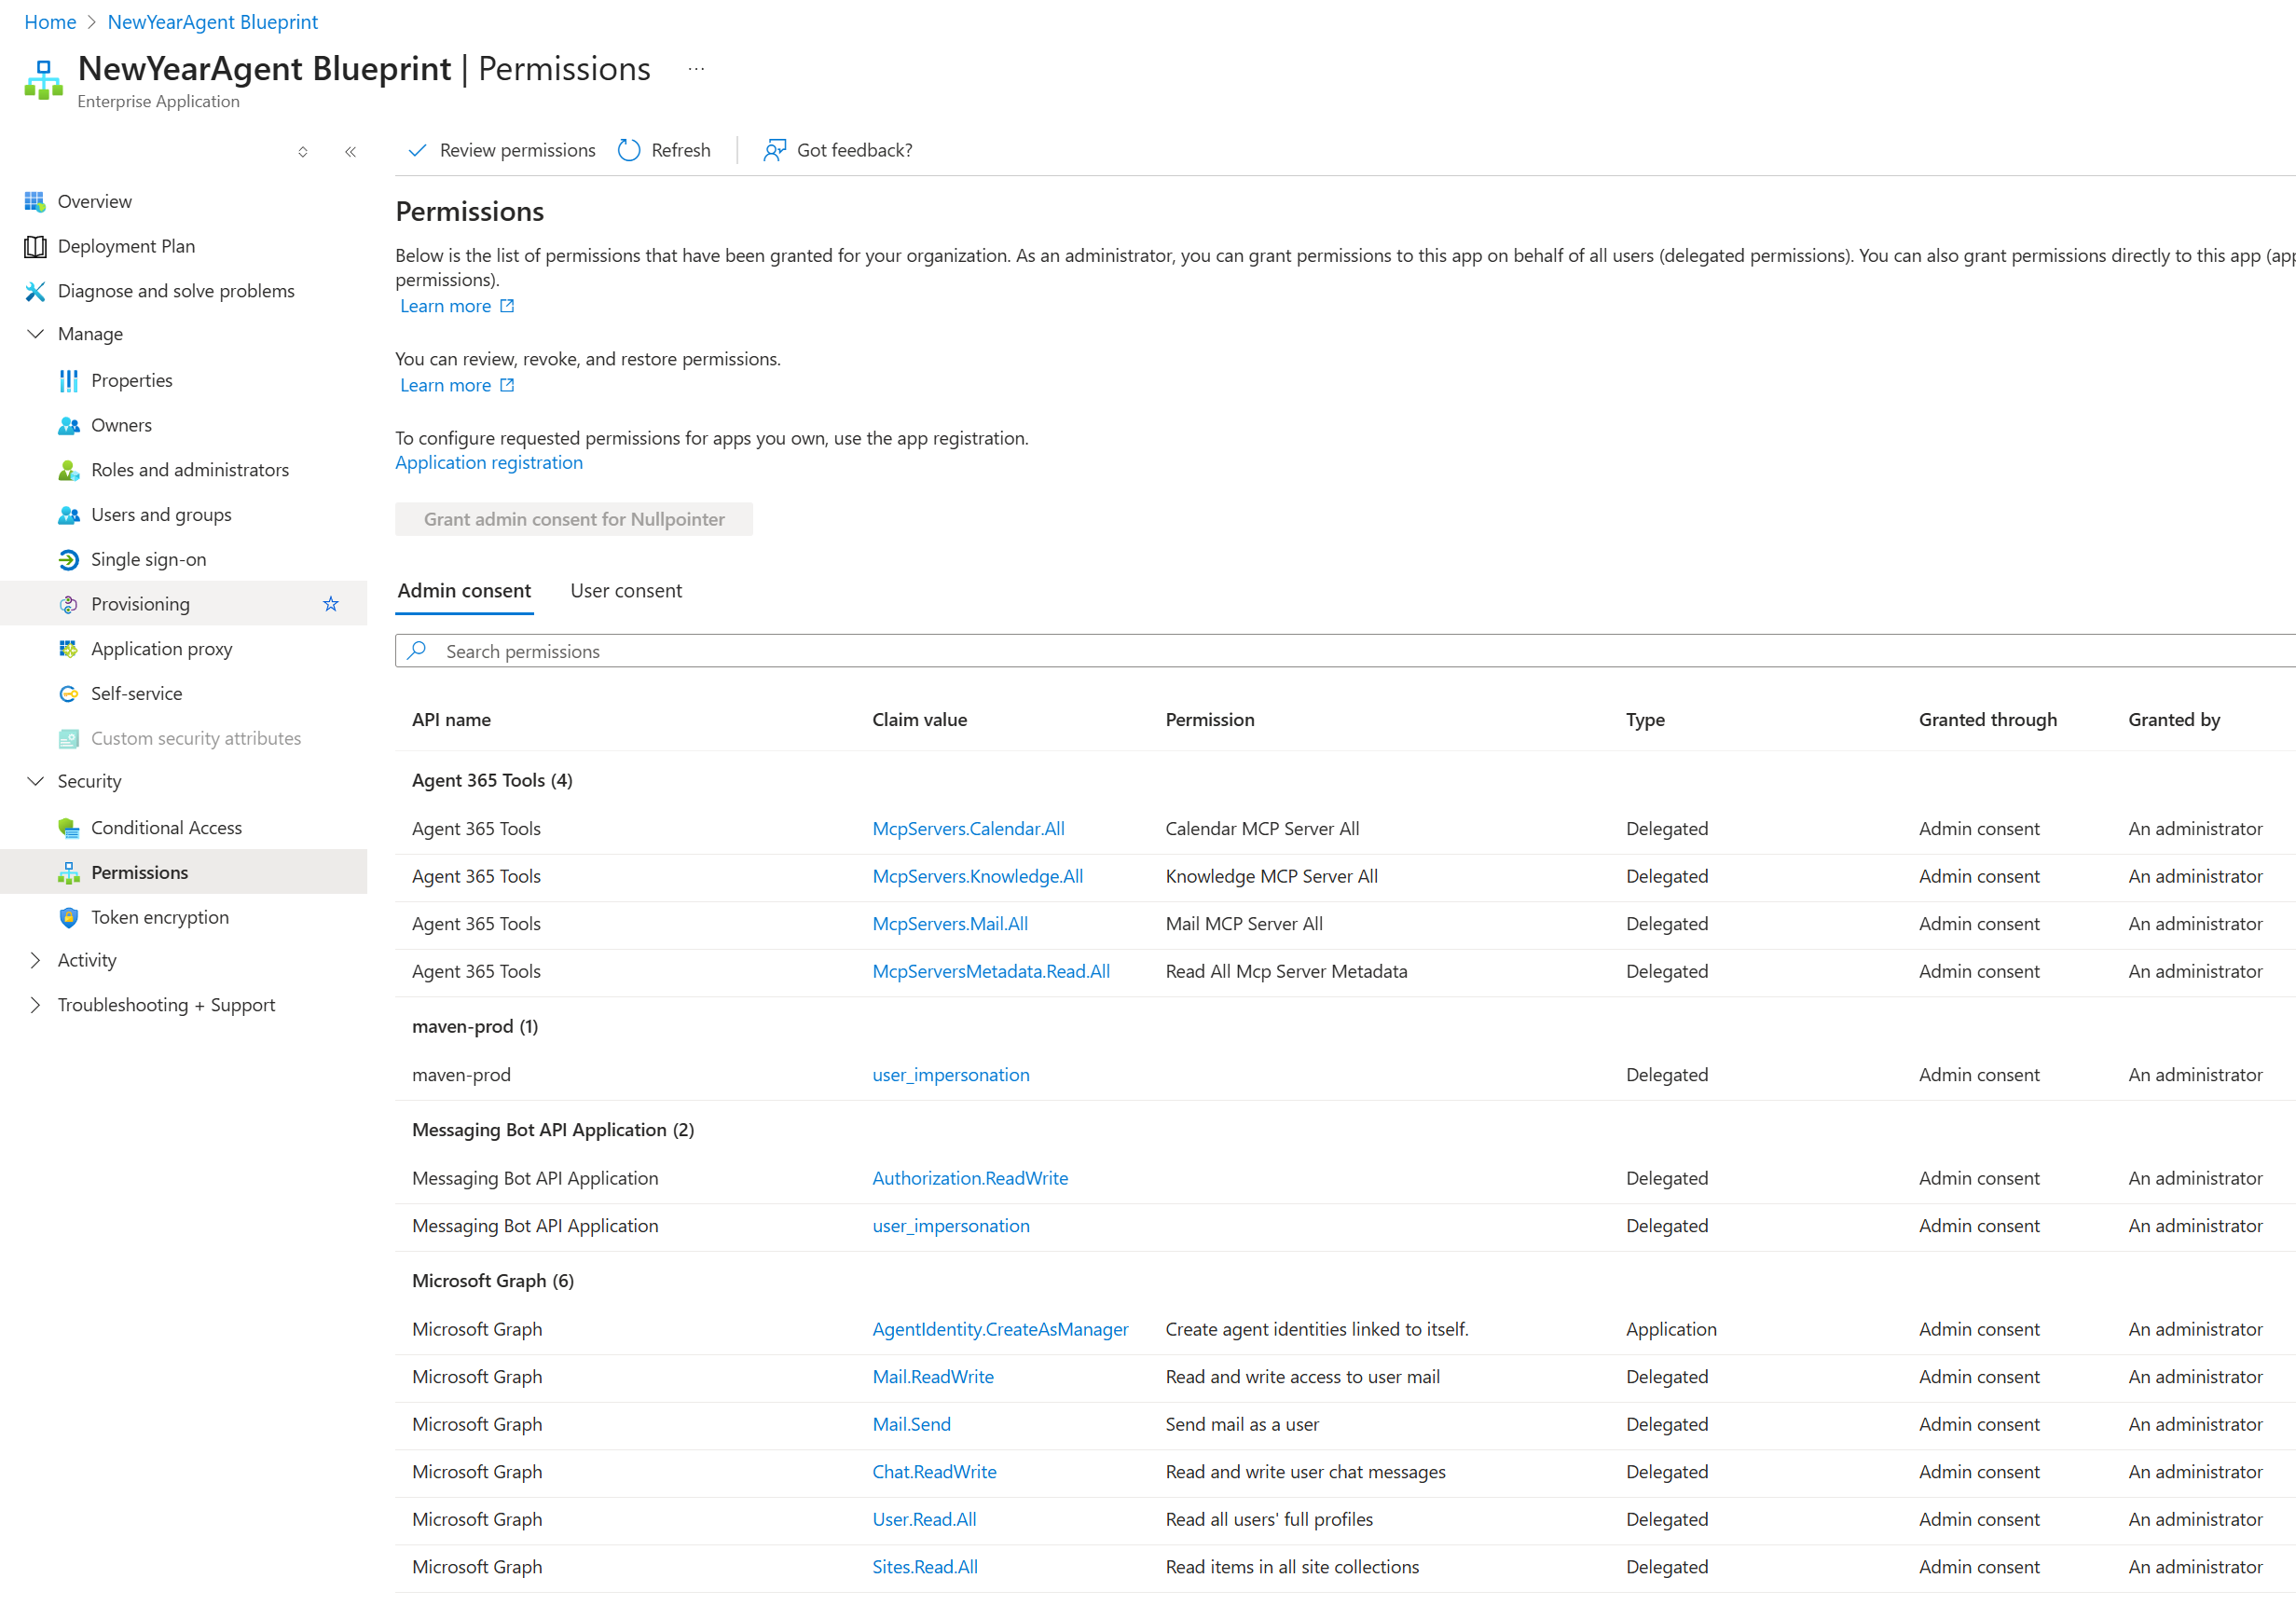
a365 setup permissions mcp- To configure the permissions for the A365 MCP Servers.a365 setup permissions bot- To configure Bot API permissions.
After running these commands, a number of new permissions are added to the service principal:
So far so good, the infrastructure is (almost) in place. Let’s continue!
Step 2 - Publishing the agent
Now we almost have everything we need to be able to create agentic identities in our tenant. We still need to:
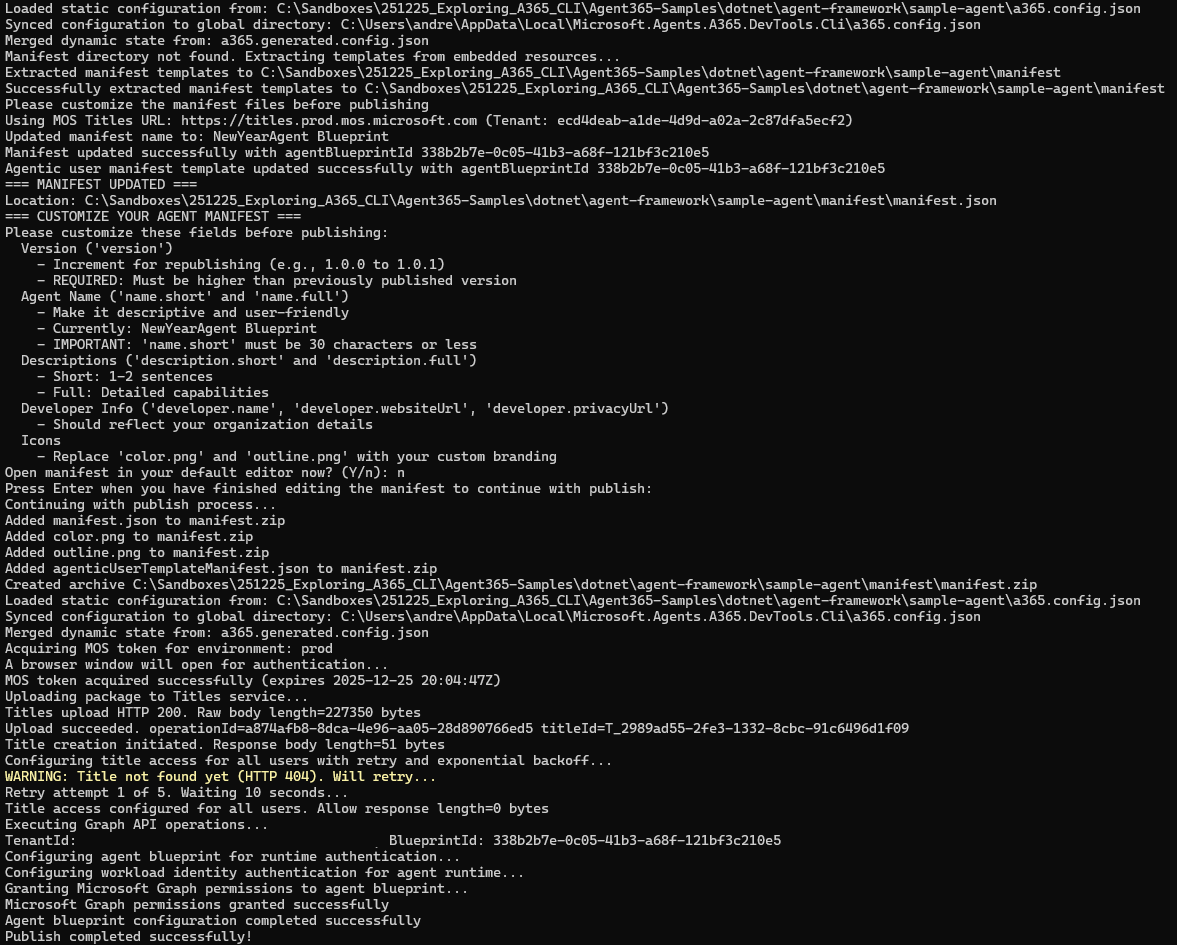
- Publish the agent to the M365 Admin Center, as is described here. We do this by running the
a365 publishcommand. This creates a zip-file containing the agent manifest, and uploads it to Microsoft 365.
- Then, we must follow the instructions here to configure our agent identity blueprint to point to the Bot that was provisioned (and that is completely managed by Microsoft, and which we have no access to unfortunately…):
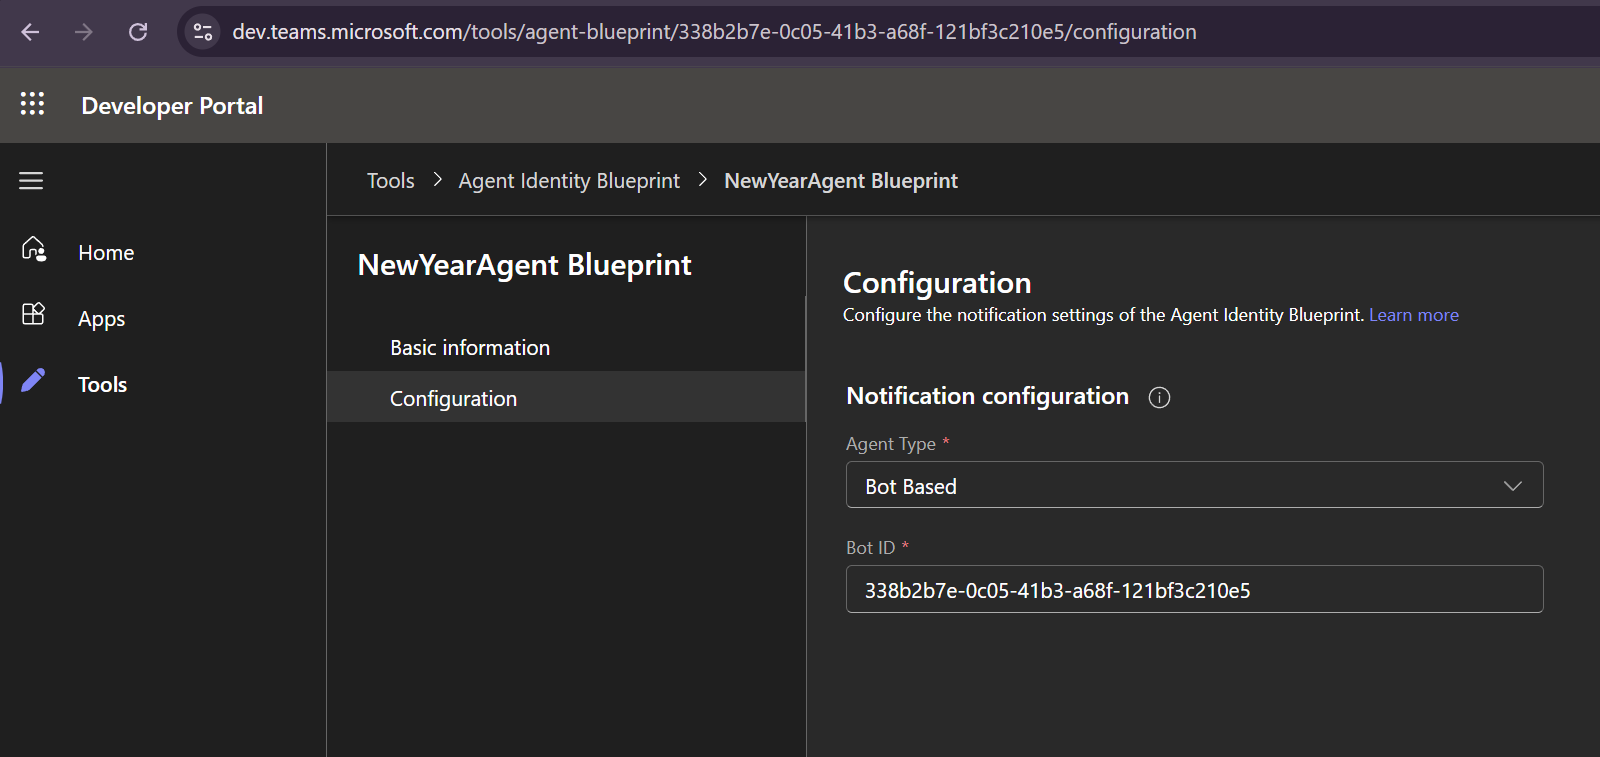
Pro tip: The bot ID is the same ID as the ID of the agent identity blueprint.
Step 3 - Creating the agent identity and agent user
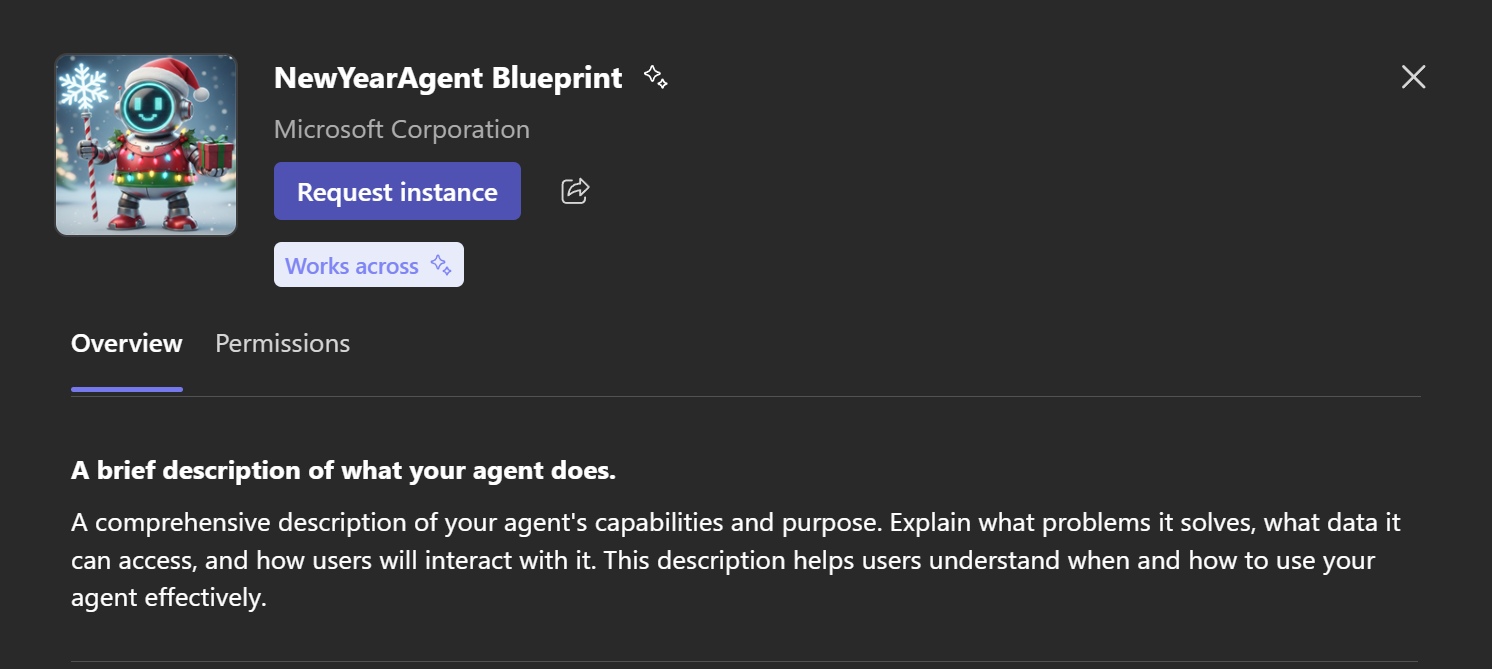
Now that the agent (manifest) is published to our tenant, we can go to Microsoft Teams and create an instance of the agent:
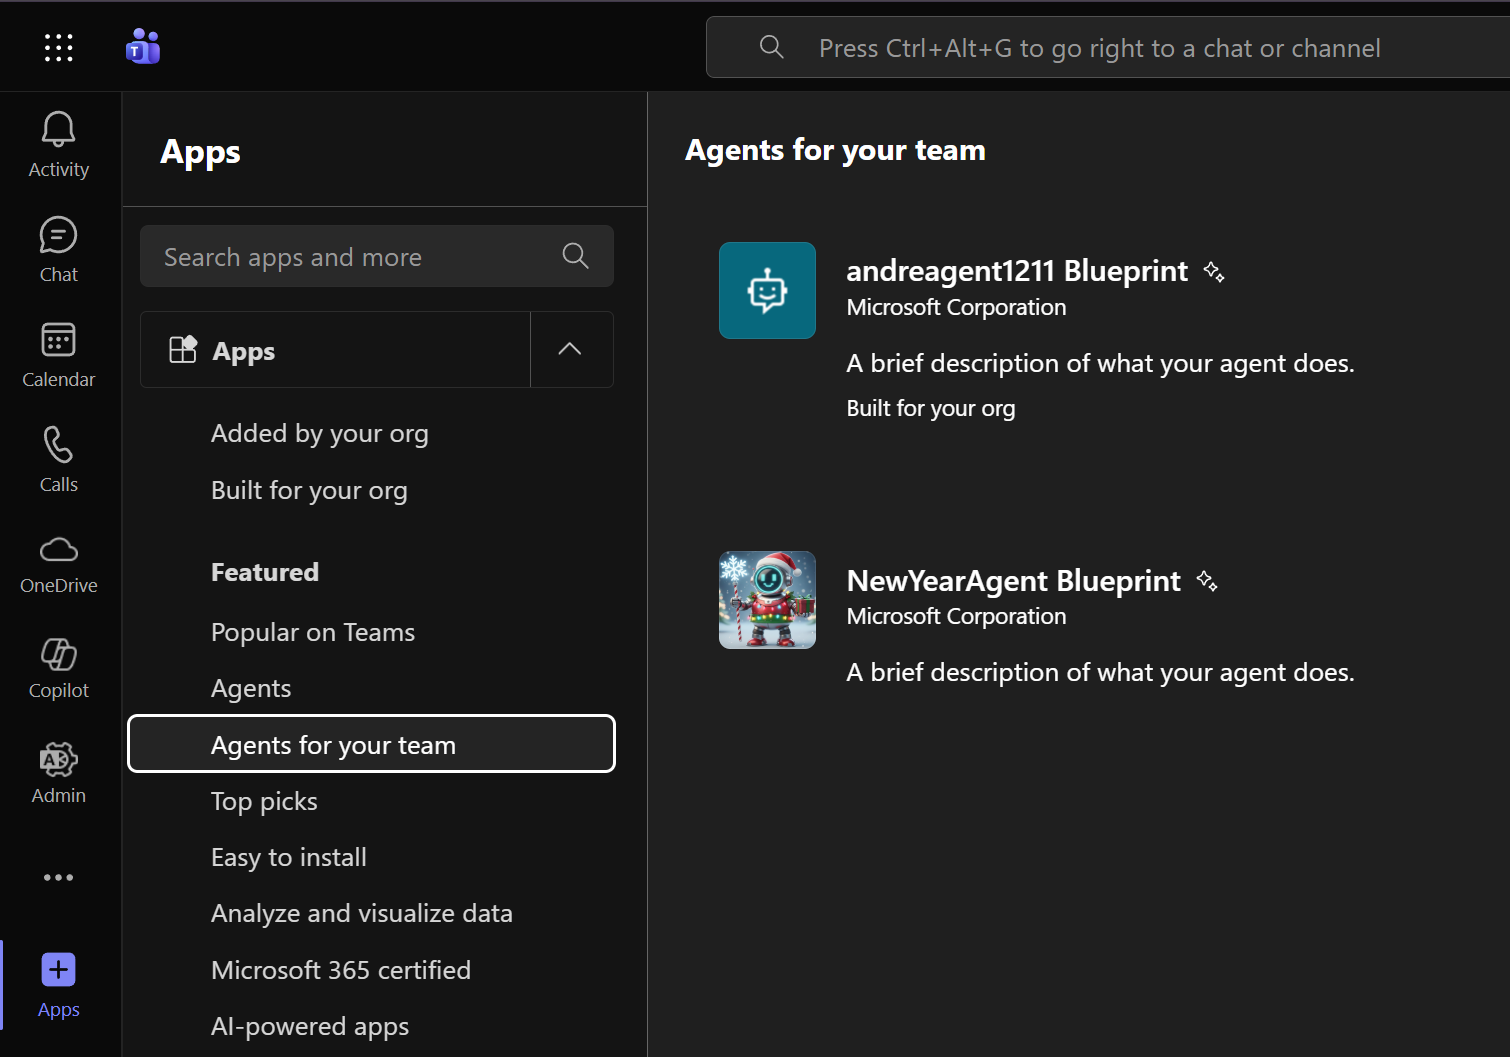
Click “Request instance”:
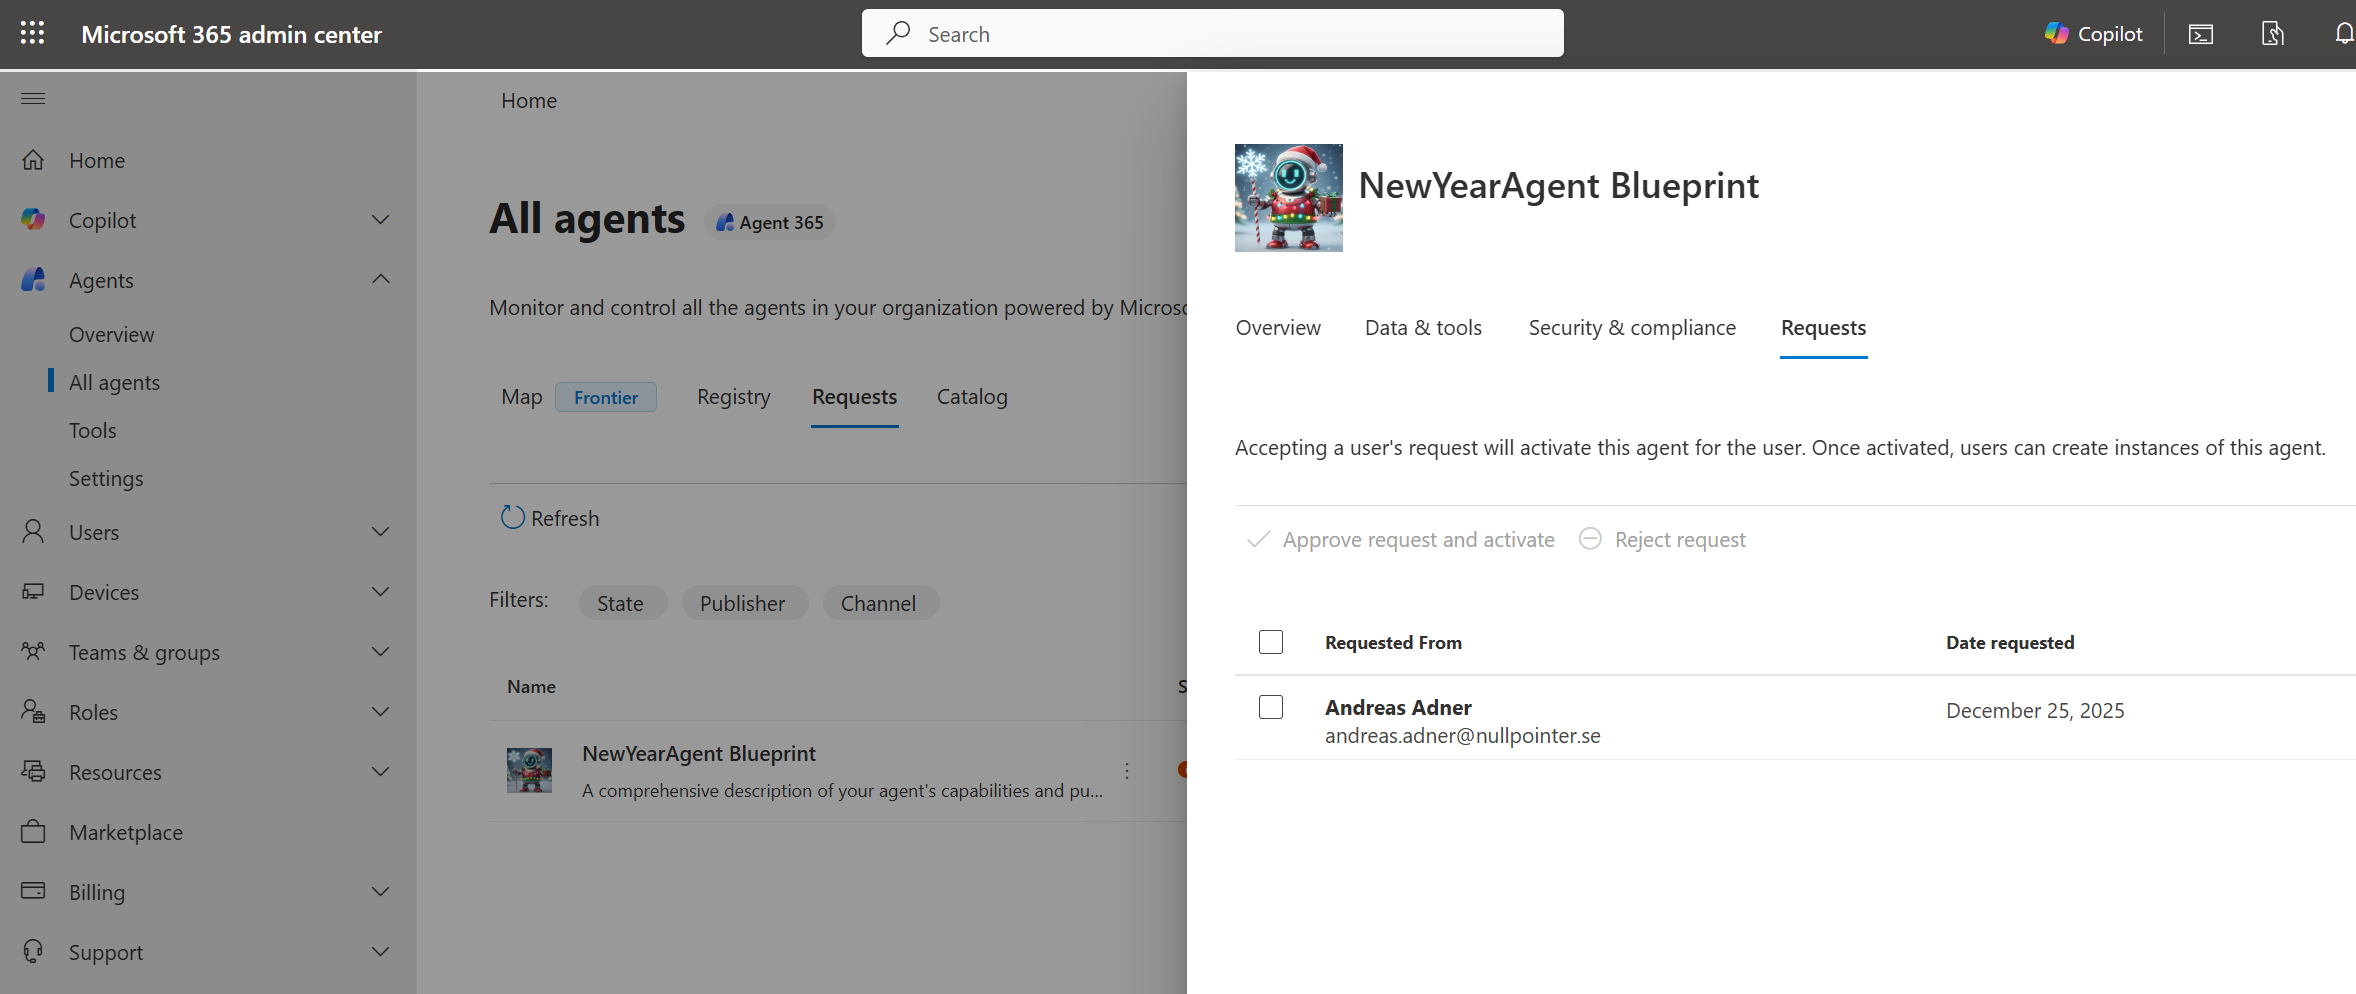
Now back to M365 Admin Center, where you can approve the request:
Back to Teams, where it is now possible to create an instance of the agent:
When this is completed, two things are created:
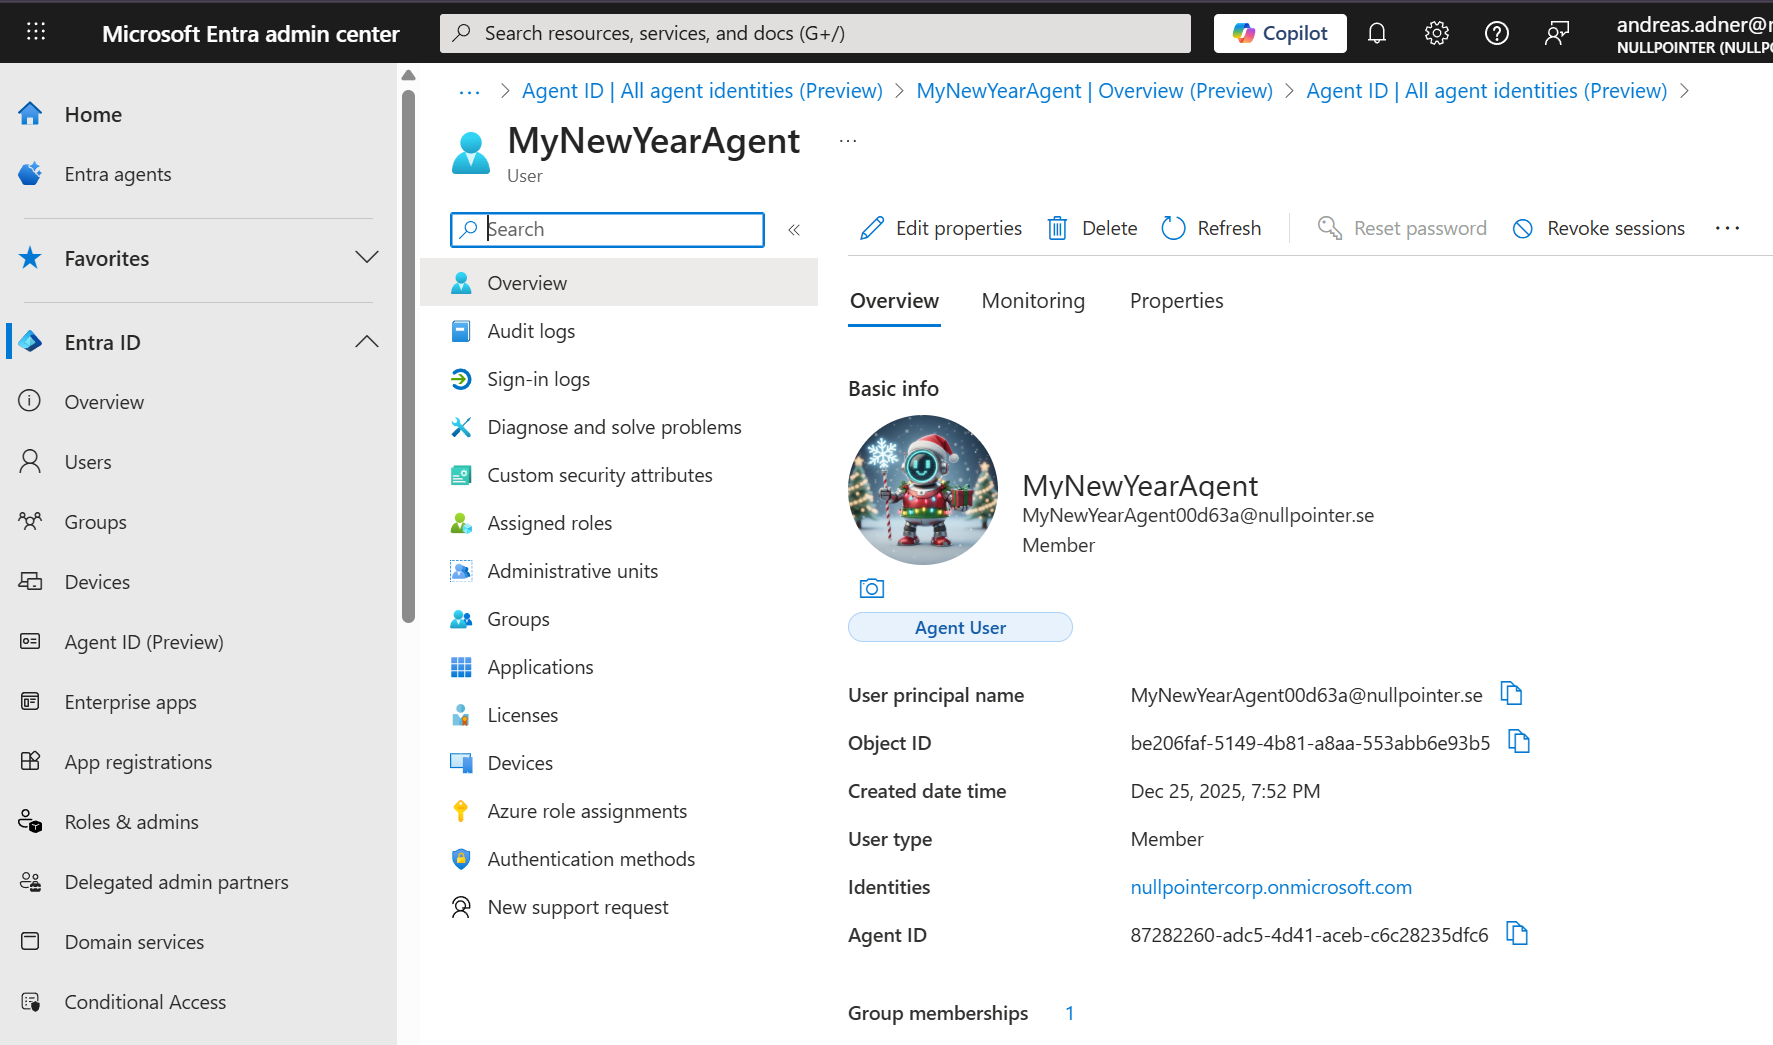
- An agent identity, which is a “special service principal in Microsoft Entra ID. It represents an identity that the agent identity blueprint created and is authorized to impersonate”:

- An agent user, which is a “specialized identity type designed to bridge the gap between agents and human user capabilities”:
Now when everything is created in the cloud, let’s move on to trying to test our agent locally.
Step 4 - Testing the agent locally
First, make sure that your devtunnel is running by executing the command devtunnel host new-year-tunnel (change to the ID of the tunnel you created).
Make sure to update appsettings.json so that it points to an LLM deployment in Microsoft Foundry:
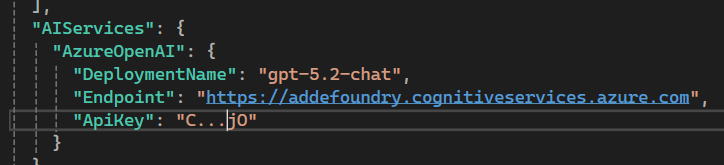
Some additional tweaks need to be made to the appsettings.json:
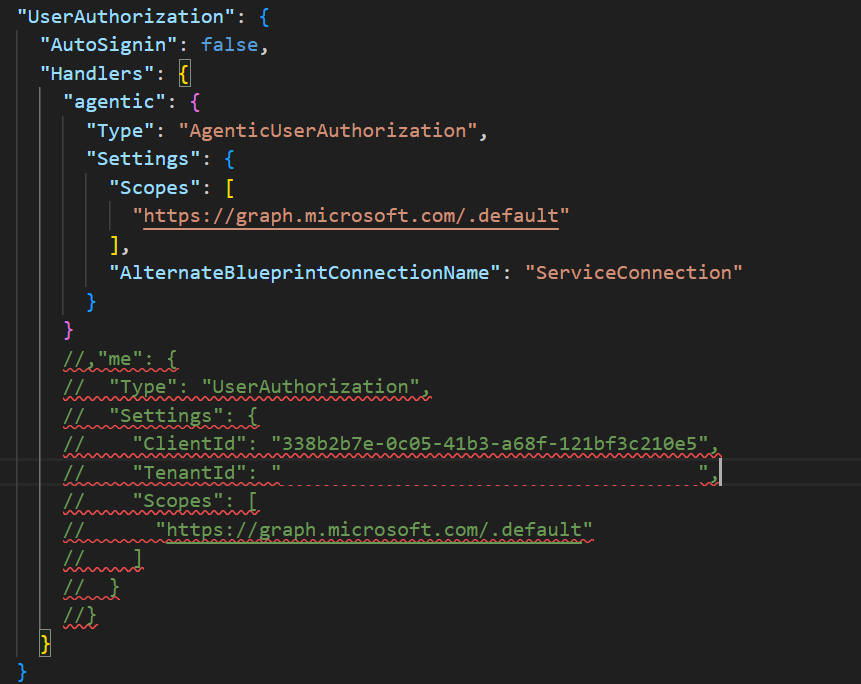
- The
AuthTypeof the Service Connection needs to be changed toClientSecret, instead ofUserManagedIdentity- since we are running locally and don’t have a Managed Identity set up for our agent web application.
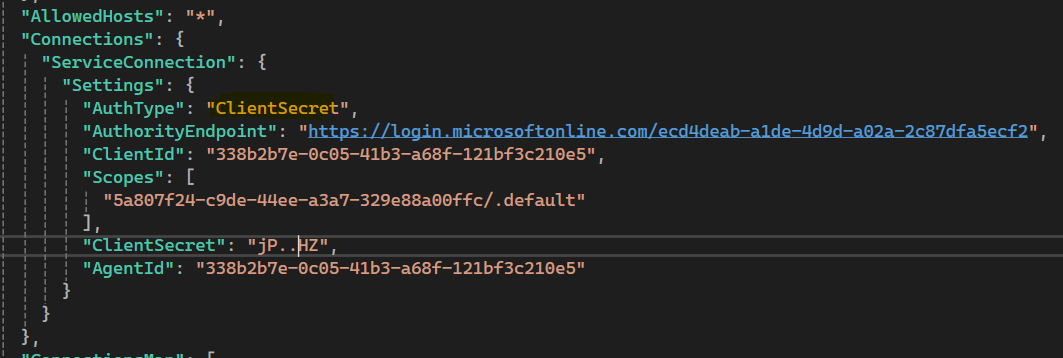
- Remove all authorization handlers except the
AgenticUserAuthorizationhandler (don’t ask me why, it just doesn’t work otherwise…):
Now let’s debug our agent! As can be seen, the agent web app responds at port 3978, which is the same port as our devtunnel points to:

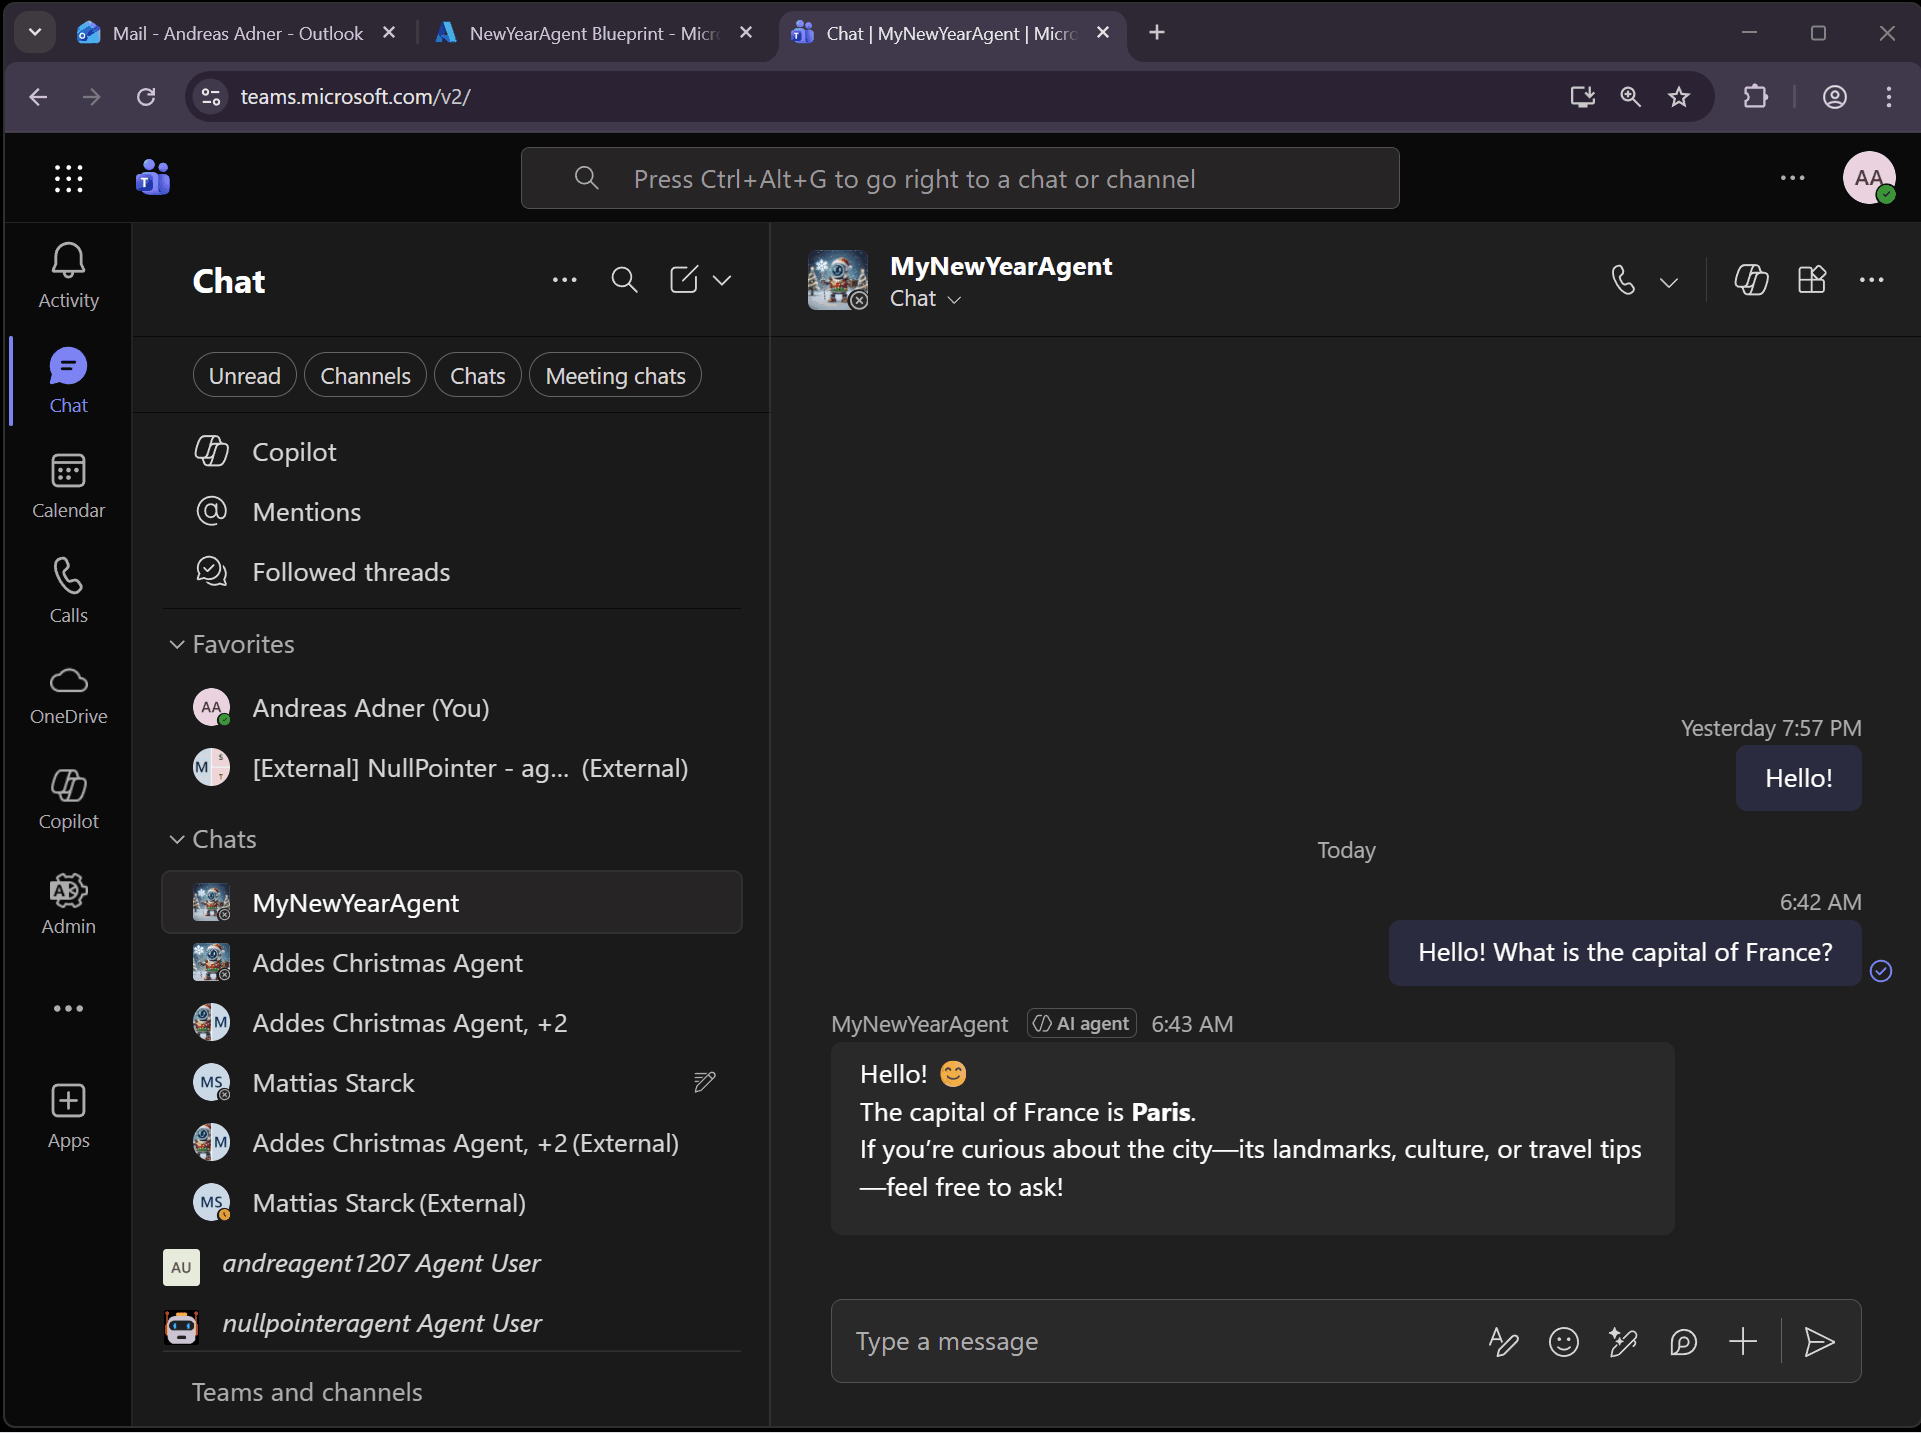
The moment of truth! Let’s ask the agent a question in Teams:
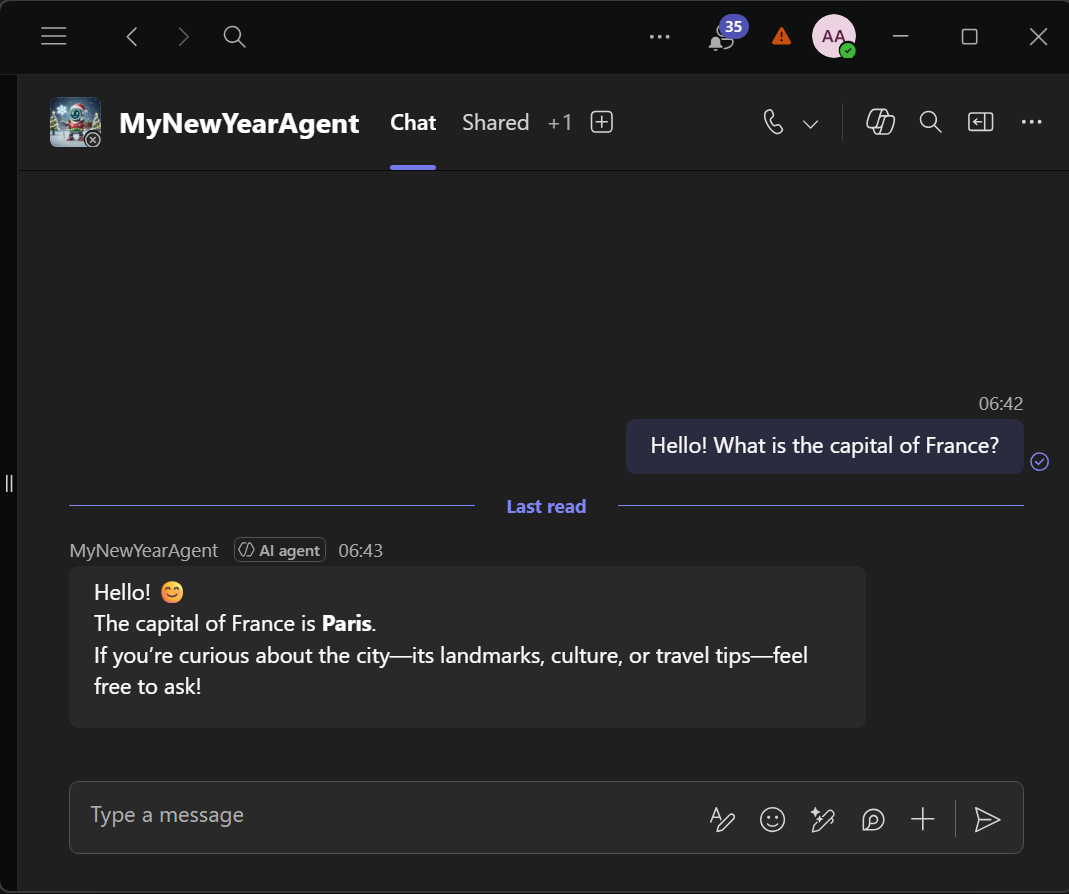
Great success, we have successfully provisioned an agent in Agent 365, published it to Teams and are now able to debug it locally using devtunnels!
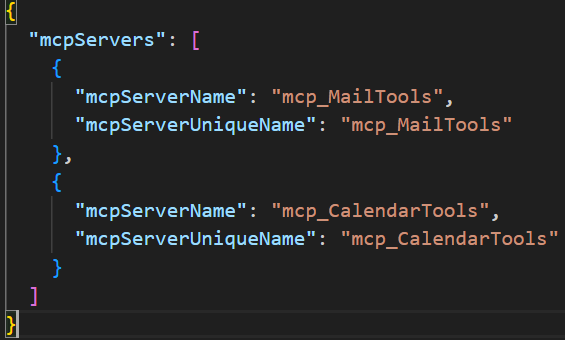
But what about MCP Servers? If we review the ToolingManifest.json file, we can see that the agent currently has access to two A365 MCP Servers:
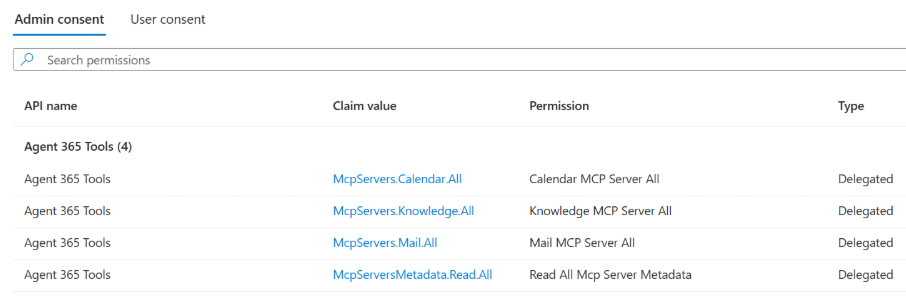
Looking at the agent blueprint, we can see that the blueprint has the required permissions for these MCP Servers (which are inherited by the agent identity):
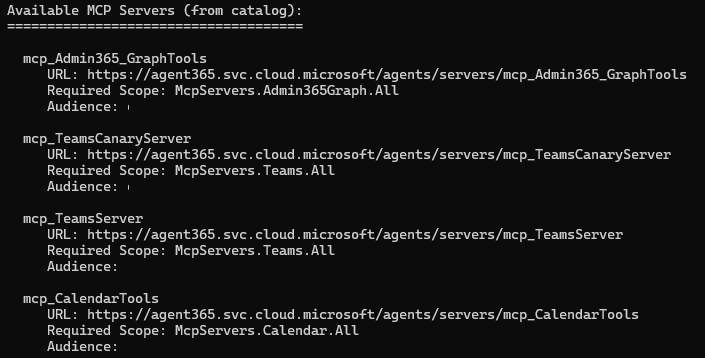
But how do we add more MCP Servers? In the documentation we see that there is an a365 develop list-available command, that can be used to list all the MCP Servers that are available in the catalog:
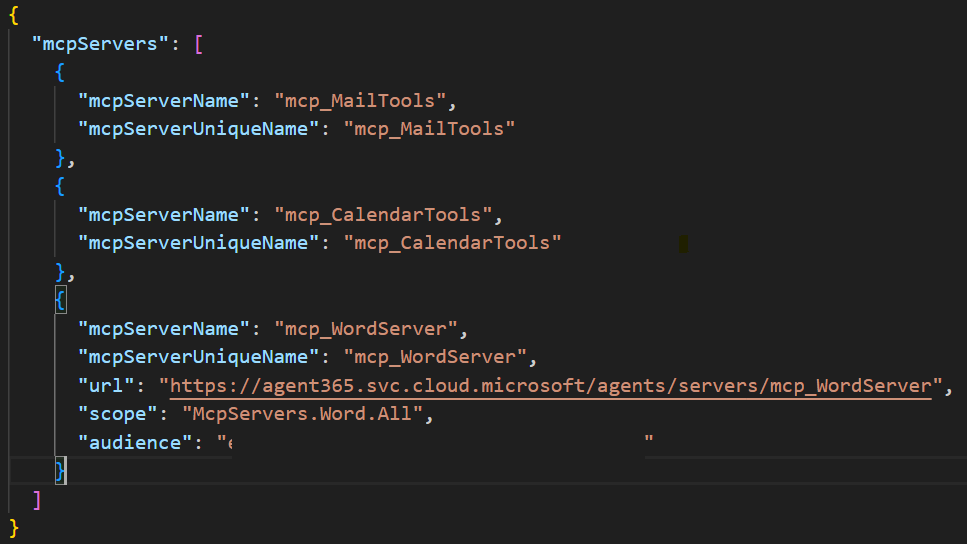
And we can add for example the Word MCP Server by running the a365 develop add-mcp-servers mcp_WordServer command. This updates ToolingManifest.json to include the Word MCP Server:
But we are not done yet, we also need to run the a365 setup permissions mcp command again to update the blueprint with the new permissions that are required by this MCP Server. This command parses ToolingManifest.json and updates the blueprint with any missing permissions needed to invoke the MCP Servers. We can now see that the blueprint permissions have been updated:

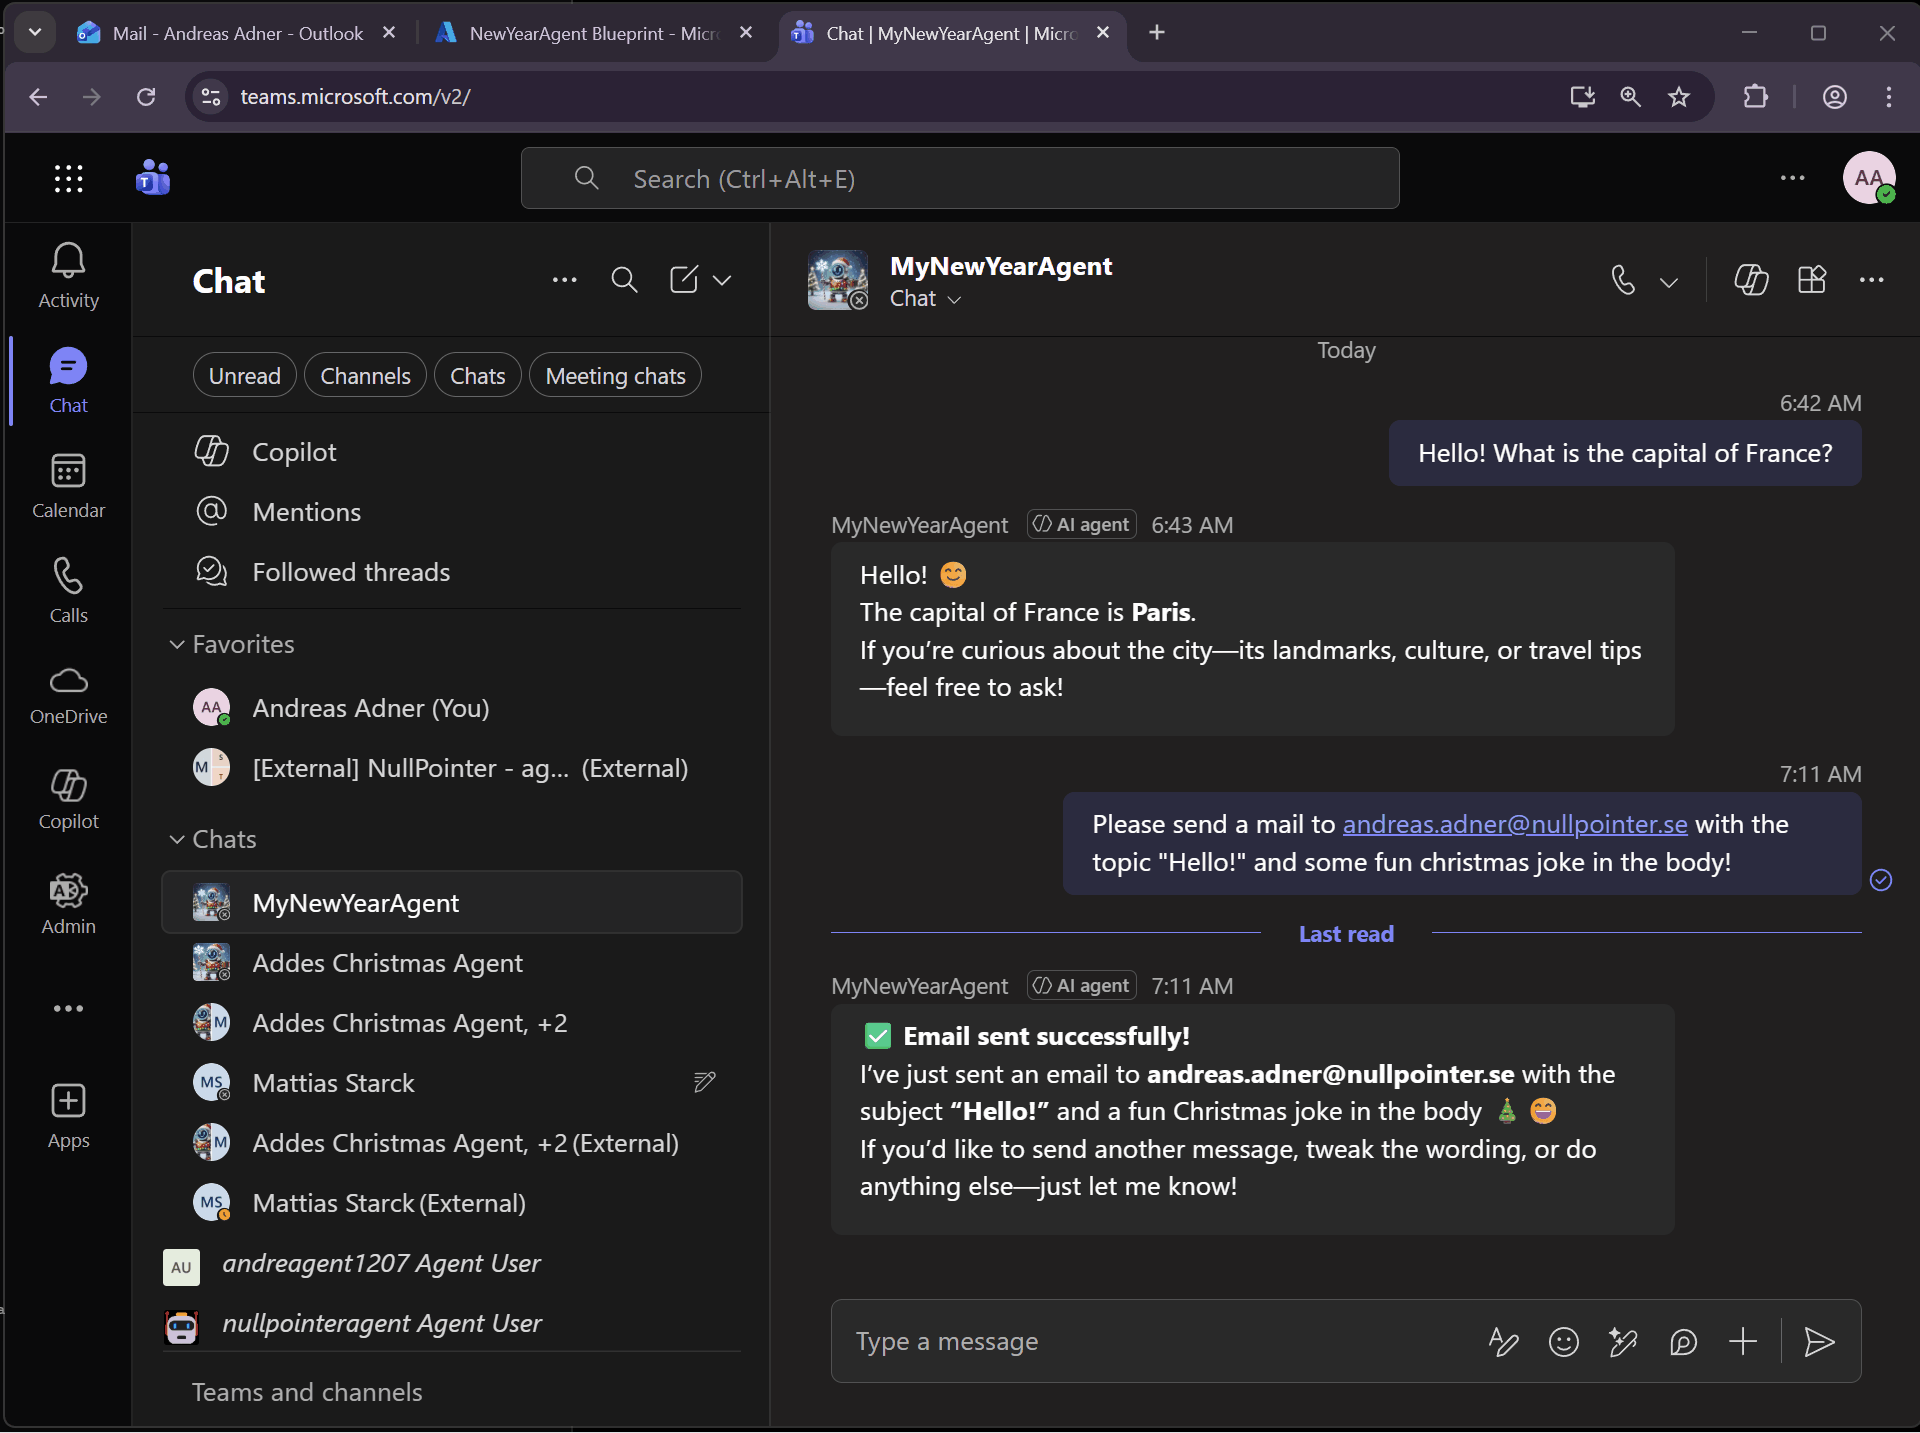
So let’s try the MCP Servers by asking the agent to send us a mail, by utilizing the mcp_MailTools MCP Server:
We can also ask the agent to book a meeting, which uses the mcp_CalendarTools MCP Server:
Pretty cool… But what if we want to use other MCP Servers? In a previous blog post I showed how to dynamically create MCP Servers using the Agent 365 MCP Management MCP Server. In the demo I created an MCP Server that could be used to retrieve data from Dataverse:
The question is, can this custom MCP Server be used from our agent? We can use the A365 Management MCP Server to get the URL and required scopes of the custom MCP server (see my previous blog post):
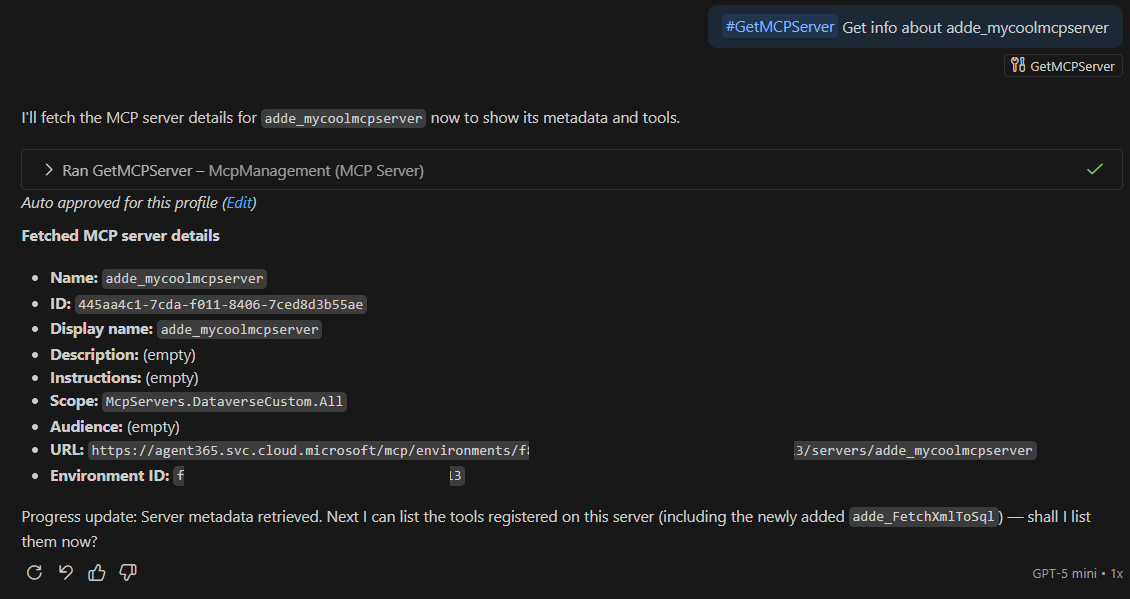
So let’s try updating ToolingManifest.json with this information:

Once again, let’s run a365 setup permissions mcp to update the blueprint with the new permission - McpServers.DataverseCustom.All - that is required by the custom MCP server.
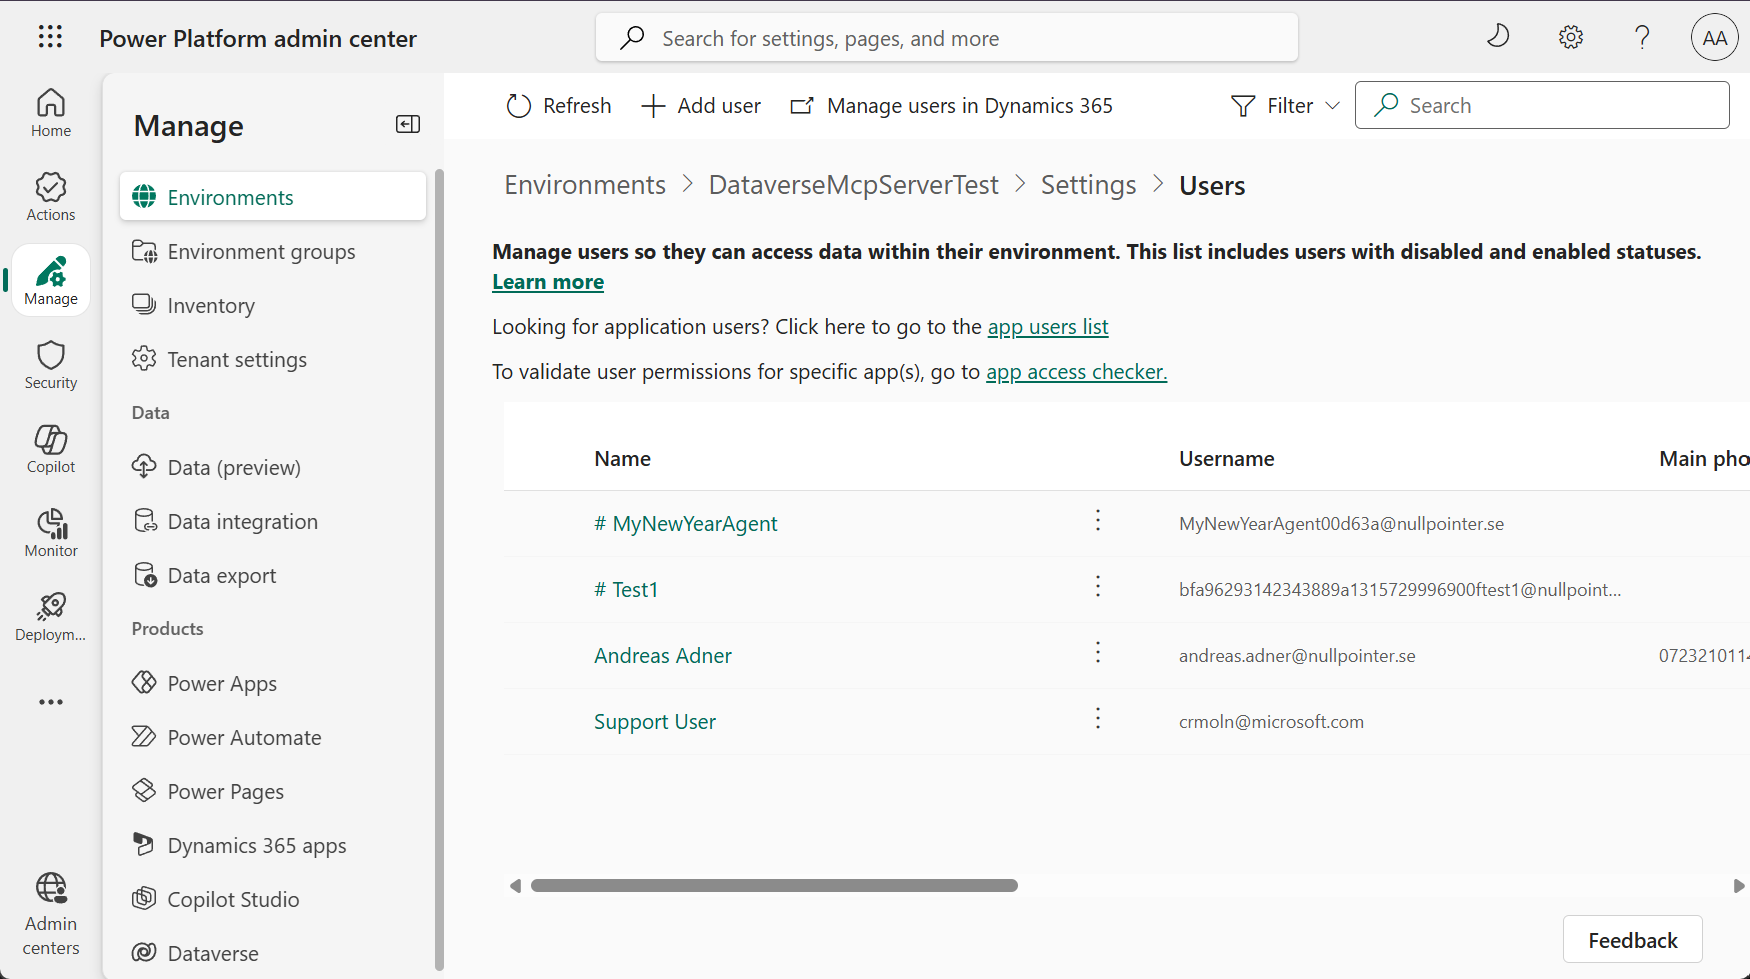
Next, we need to add the agentic user as a user in Dataverse. Yes, amazing isn’t it? This is the power of the agentic user - that it can be added to existing applications like Dynamics 365 as a licensed user, with security roles and all. What a time to be alive!
So, let’s try and run the agent and load my custom MCP Server! Hmm… It doesn’t seem to work. After some debugging I realized there was an issue in the way that the Agent 365 SDK parses ToolingManifest.json when running locally, the method ParseServerConfigFromManifest doesn’t read the url parameter from the file, instead it defaults to a URL that works for other A365 MCP Servers, but not for our custom one.
Let’s fix this!
I forked the Agent 365 SDK repo and created this PR which updates ParseServerConfigFromManifest to also read the url parameter from ToolingManifest.json. I then rebuilt the agent using my fork. With the fix in place the agent also loads my custom MCP Server, and it can be used side-by-side with the OOB A365 MCP Servers:

So, there we have it - a custom agent using the Microsoft Agent Framework that is deployed to the Agent 365 infrastructure, Agent 365 MCP Servers working in tandem with dynamically created MCP Servers, data retrieved from Dataverse, agentic users in Teams and local debugging - feels like a Christmas miracle! ☃️🎅
It has been a real treat to explore Agent 365, and I am really looking forward to all the new cool features that will come 2026 as the platform evolves. Until then, happy new year and happy hacking!